
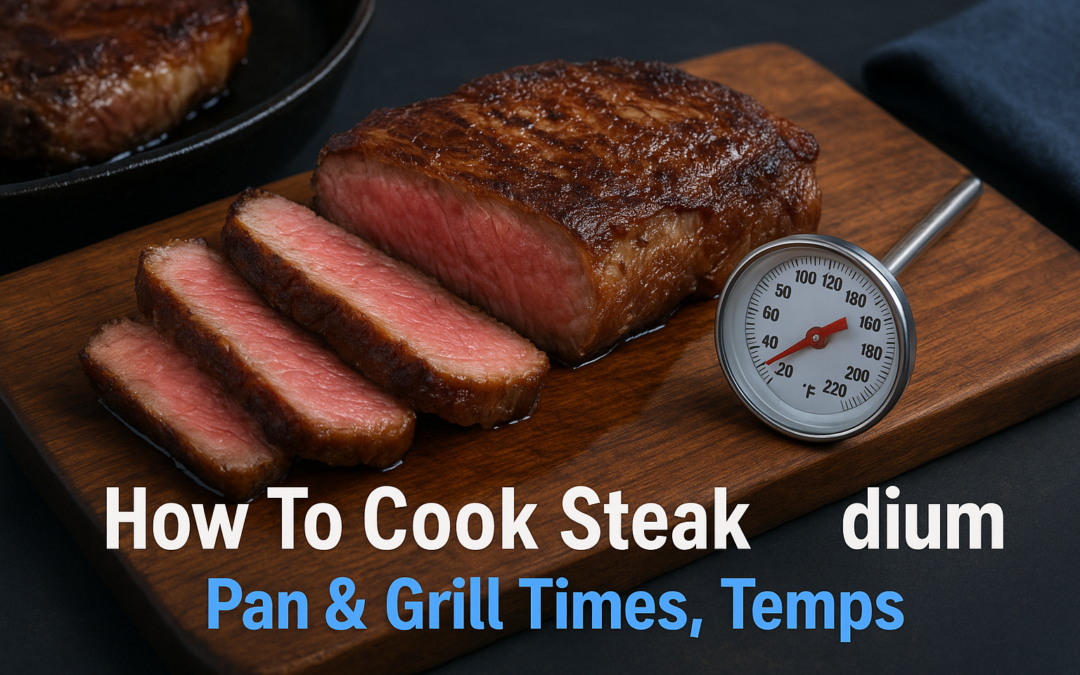
A steak cooked to medium hits a sweet spot that most home cooks struggle to nail consistently. Knowing how to cook steak to medium means hitting an exact internal temperature window, not guessing by poking the meat or cutting into it. At La Dolce Vita Cucina, our kitchen team in Chicago’s Portage Park neighborhood cooks steaks like our 16oz Ribeye to precise doneness levels every single service, and the method behind it is more straightforward than you’d think.
Medium doneness gives you a warm pink center with a seared, flavorful crust on the outside, firm enough to have structure, but still juicy throughout. It’s the most forgiving target on the doneness scale, which makes it a great place to build confidence if you’ve been overcooking your steaks at home.
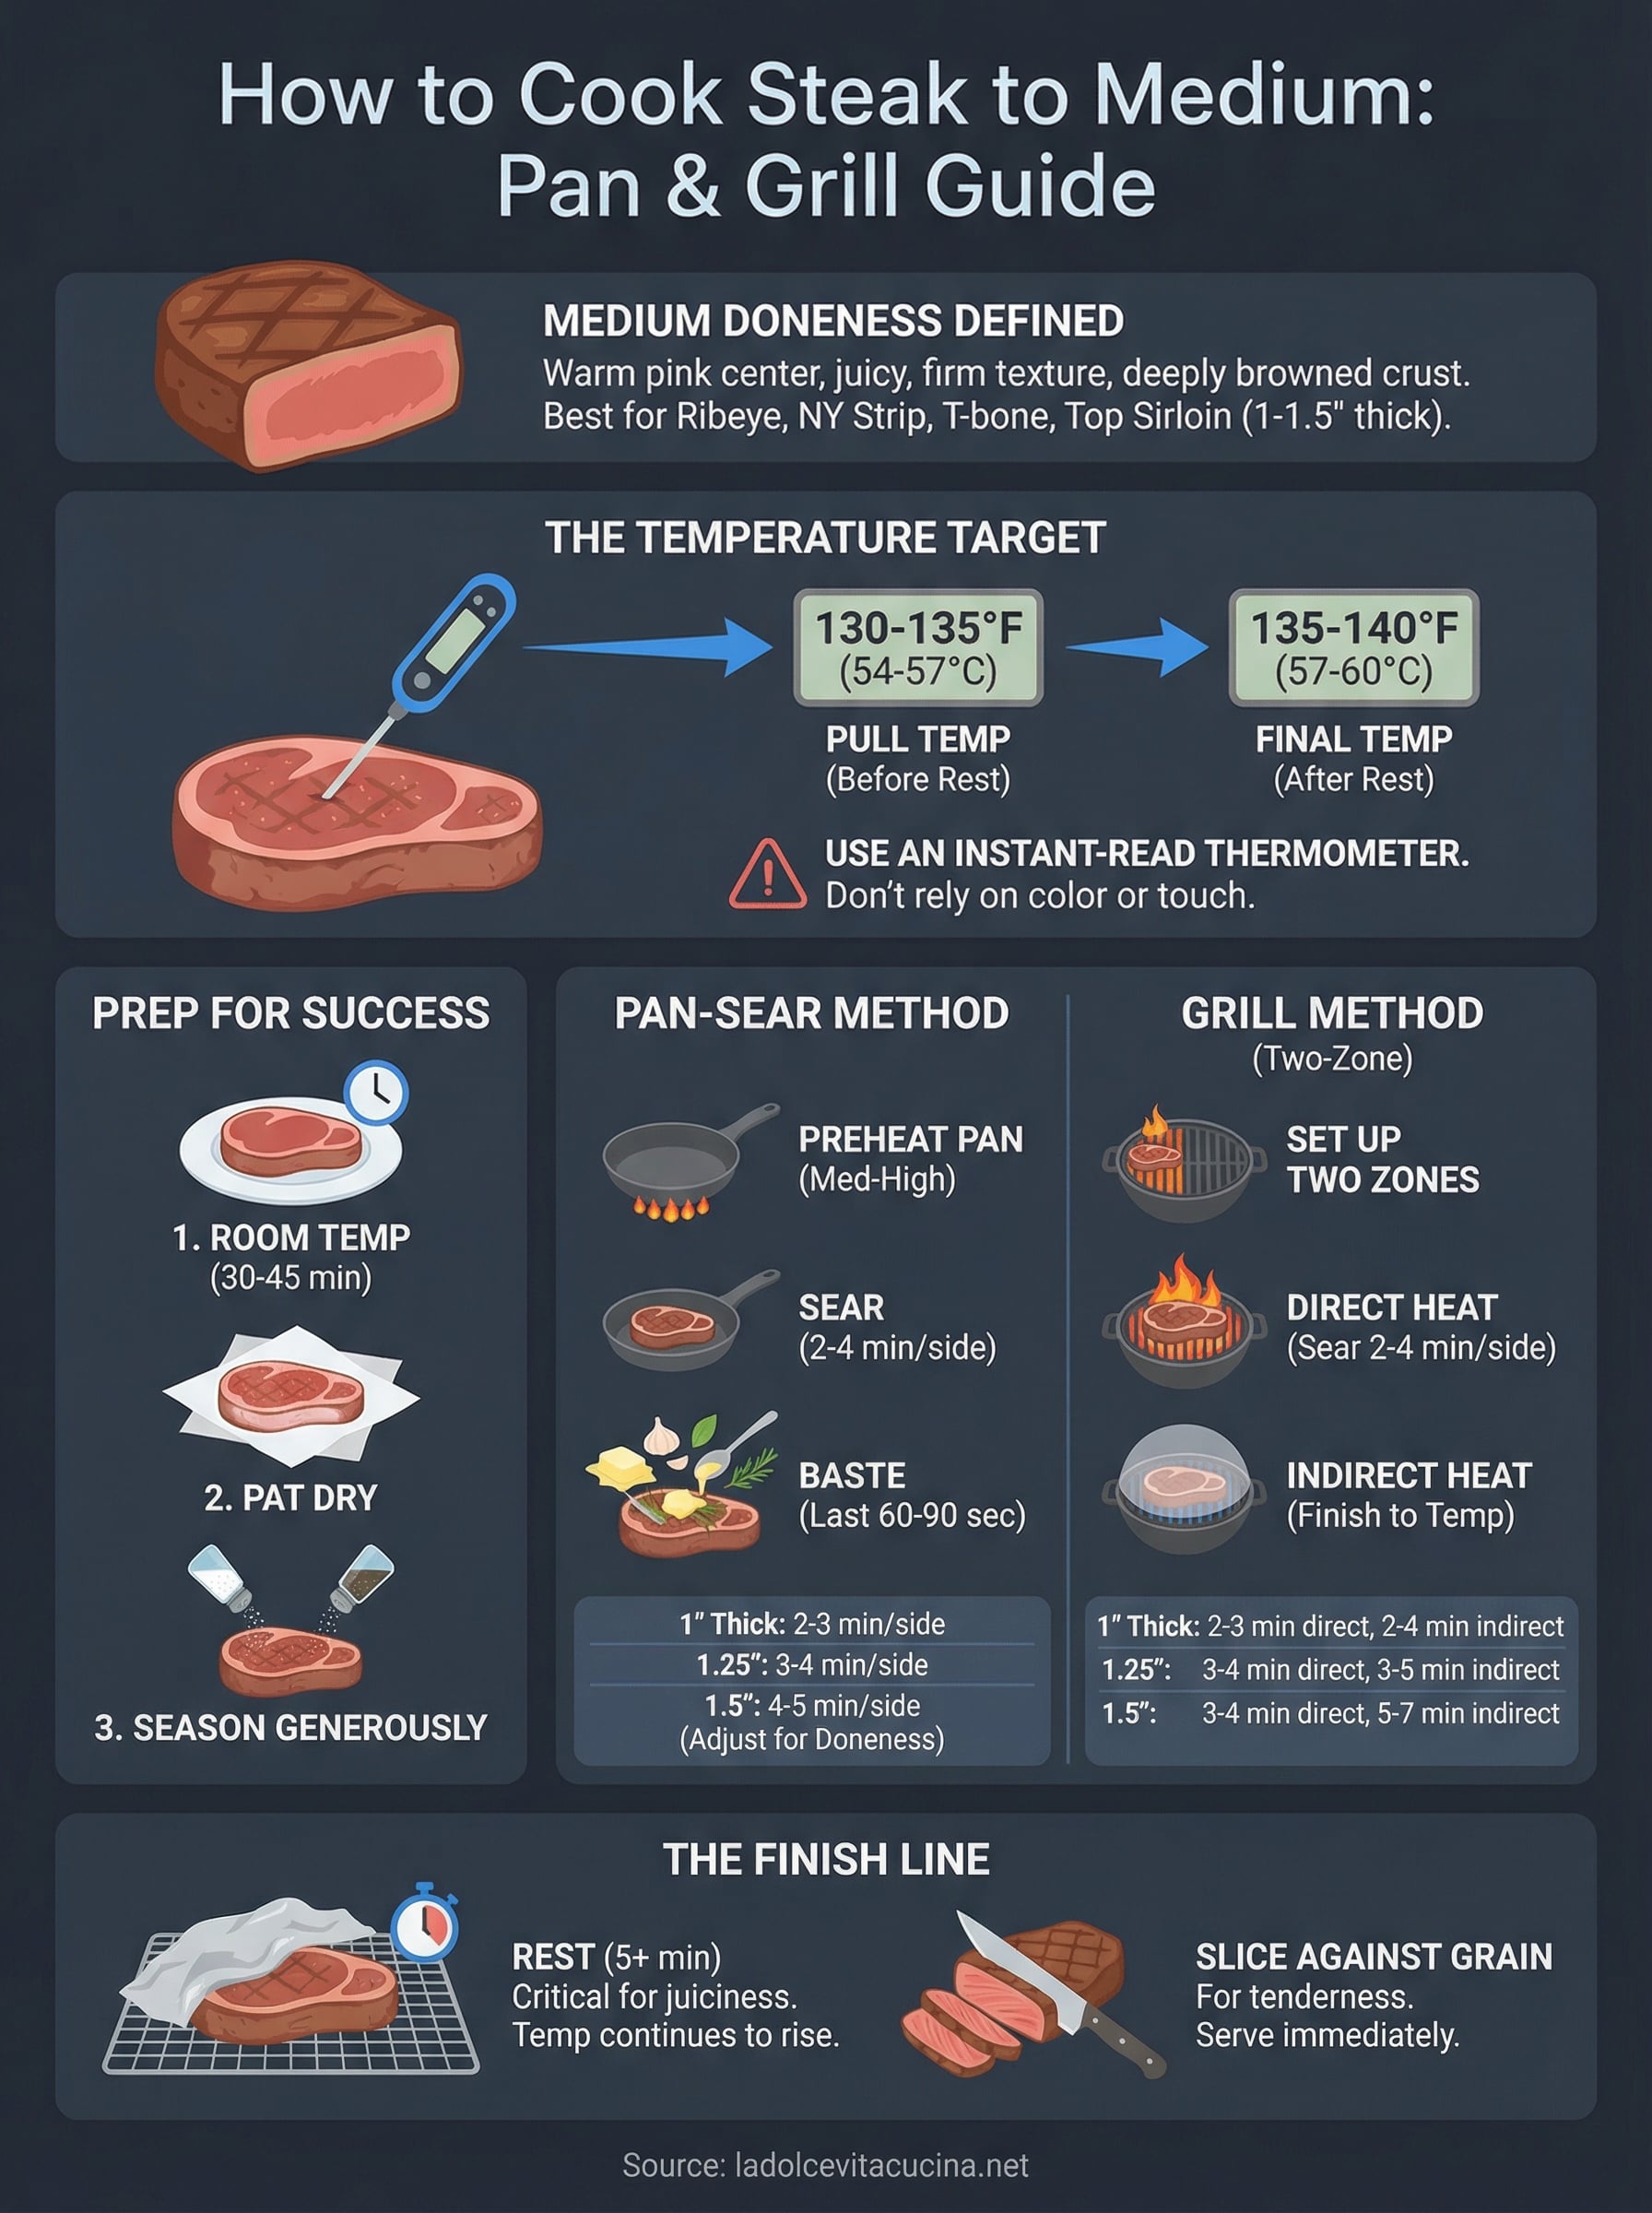
This guide breaks down the exact temperatures, timing per side, and techniques for both pan-searing and grilling a medium steak. We’ll also cover how to choose the right cut, why resting matters, and the common mistakes that throw everything off. No guesswork, no wasted meat, just a reliable process you can repeat every time.
What "medium" steak means and the target temps
When you cook a steak to medium, you’re targeting a specific internal temperature range, not a color you guessed at or a texture you judged by pressing the meat with your thumb. Medium means the center of the steak reaches 130°F to 140°F (54°C to 60°C) during cooking, then climbs a few more degrees while it rests. The result is a warm pink center, a slightly firmer texture than medium-rare, and a crust that’s fully seared and deeply browned on both sides. Understanding that definition precisely is the foundation of knowing how to cook steak to medium with any consistency.
The exact temperature window for medium
The target internal temperature for a medium steak sits between 135°F and 140°F (57°C to 60°C) when measured at the thickest part of the meat after resting. You pull the steak off heat at 130°F to 135°F because carryover cooking adds 3 to 5 degrees while the steak rests on the cutting board. If you wait until the thermometer reads 140°F before pulling it off the pan or grill, you risk landing in medium-well territory by the time it hits the plate.
Pull your steak from heat when the internal temperature reads 130°F to 135°F, not 140°F, because resting will finish the job without any additional effort from you.
A reliable instant-read thermometer is the only tool that gives you a factual answer here. Insert it into the thickest part of the steak, away from any bone or a pocket of fat, and wait for the reading to stabilize before you act on it. Color alone will mislead you because factors like the myoglobin concentration in the muscle, the age of the cut, and even what the animal was fed all affect how pink or red a steak looks at any given internal temperature. Trusting color over a thermometer is where most home cooks go wrong.
How medium compares to other doneness levels
Understanding where medium sits on the doneness scale helps you avoid the two most common errors: pulling the steak too early and ending up with a cool red center, or leaving it on heat too long and losing the juiciness that made the cut worth buying. Each doneness level has a distinct temperature range and a noticeably different texture when you cut into it. Knowing the full spectrum gives you better control over where you’re aiming and helps you catch yourself before you overshoot.
Here is a clear breakdown of the standard doneness levels so you know exactly where medium sits relative to each option:
| Doneness | Pull Temp (°F) | Final Temp After Rest (°F) | Center Appearance |
|---|---|---|---|
| Rare | 115-120 | 120-125 | Cool, bright red |
| Medium-rare | 120-125 | 125-130 | Warm red |
| Medium | 130-135 | 135-140 | Warm pink |
| Medium-well | 140-145 | 145-150 | Slightly pink |
| Well-done | 150+ | 155+ | Brown throughout |
Medium gives you the best of both worlds for most cuts: enough heat to fully render some of the intramuscular fat and firm the texture slightly, while still leaving enough moisture in the muscle fibers to keep each bite juicy and satisfying. For heavily marbled cuts like a ribeye or a thick New York strip, medium is often the doneness level where the fat has enough time to melt properly into the meat without the exterior drying out or the fibers tightening to the point of toughness. Leaner cuts like a sirloin also hold up well at medium because the slightly firmer texture at this temperature range actually improves the eating experience compared to a rare center, which can feel slippery and underdeveloped in a cut that lacks significant marbling.
What you need before you start
Having the right setup before you touch the heat source separates a consistent result from a frustrating guessing game. Knowing how to cook steak to medium starts well before the pan gets hot, and taking two minutes to gather the right tools and select the right cut will save you from a steak that ends up overdone on the outside and wrong in the center.
The right cut for medium doneness
Not every steak performs the same way at medium doneness. Thicker cuts between 1 and 1.5 inches give you the most control because they take longer to cook through, which means you have more time to monitor the internal temperature and pull the steak at exactly the right moment. Thin cuts under 3/4 inch cook so fast that hitting a precise temperature becomes difficult without burning the exterior first.
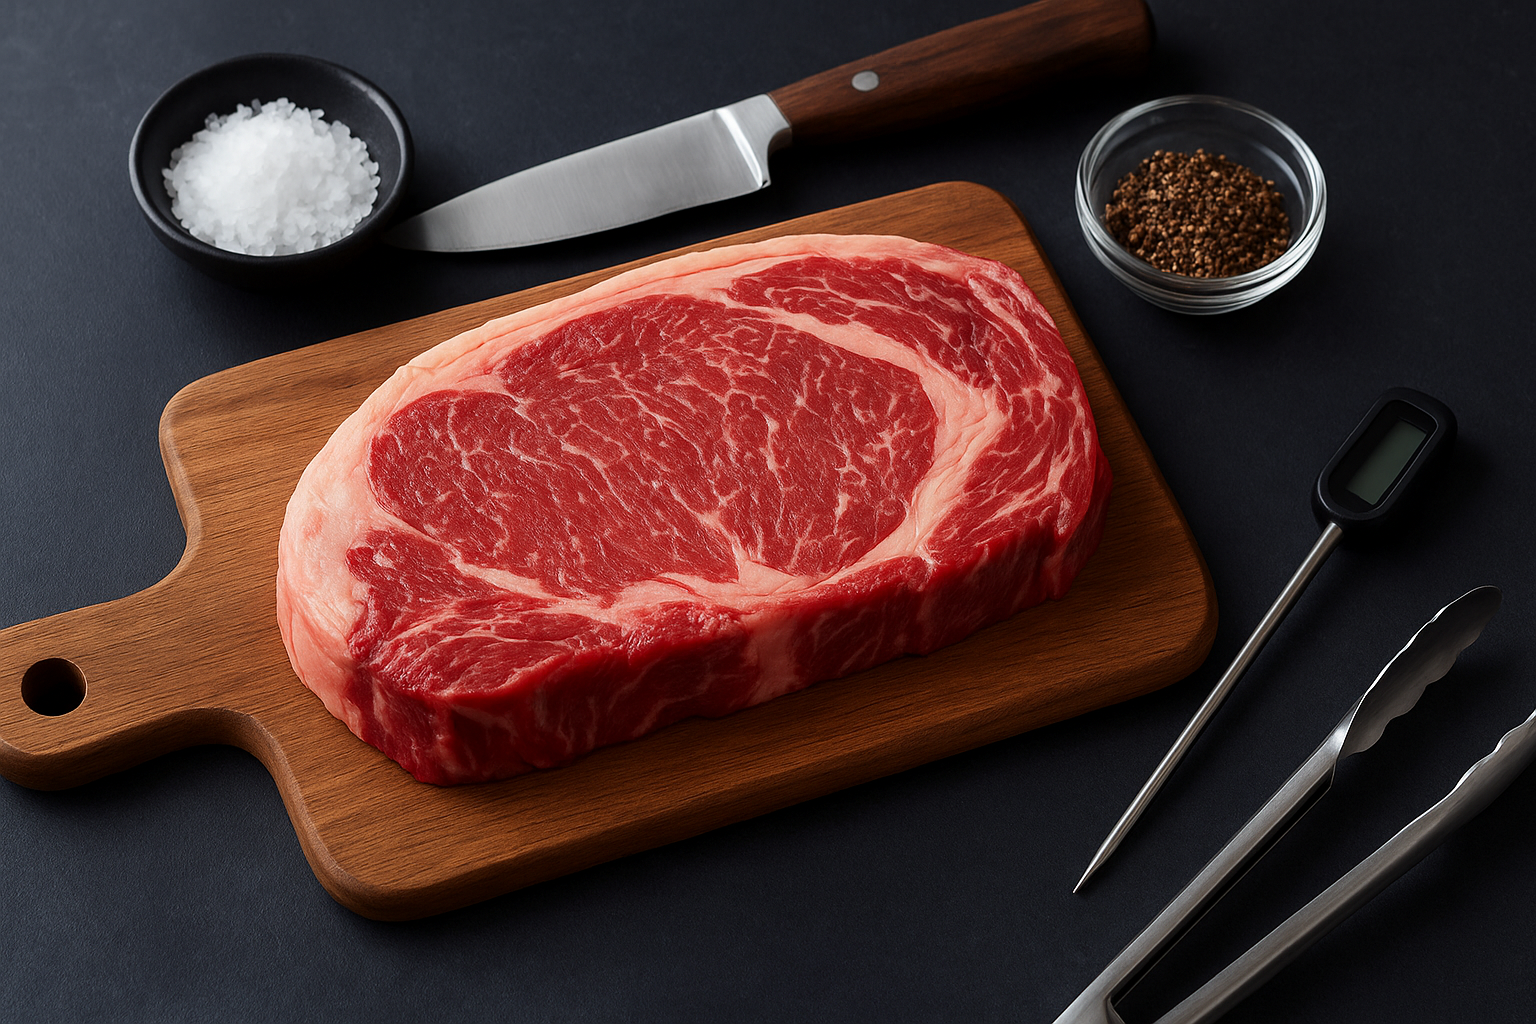
Aim for a steak that’s at least 1 inch thick; it gives you the time and margin needed to hit your temperature target without scorching the outside.
The cuts that work best at medium include ribeye, New York strip, T-bone, and top sirloin. Ribeye and strip are the most forgiving because their fat content keeps the meat juicy even at the higher end of the medium range. Sirloin is a leaner option that still eats well at 135°F to 140°F without turning dry or chewy. Avoid very thin breakfast-style steaks or cutlets for this method since they simply don’t give you enough mass to work with.
Tools that make the difference
You don’t need a professional kitchen setup, but a few specific items will make the process repeatable instead of random. Pull these together before the heat goes on so nothing slows you down mid-cook:
- Instant-read thermometer: A digital probe with a fast response time is non-negotiable. It gives you the only factual answer about where the steak’s internal temperature actually sits at any given moment.
- Cast iron skillet or heavy-bottomed pan: Cast iron retains heat evenly and delivers the deep, even crust you want without hotspots that cool the moment the steak makes contact.
- Tongs: Use tongs, not a fork. Piercing the meat lets juices escape every single time you touch the steak.
- High-smoke-point oil: Avocado oil or refined vegetable oil handles searing temperatures above 400°F without burning before your crust develops.
- Kosher salt and coarse black pepper: Season generously on both sides. Fine table salt dissolves too quickly and creates uneven coverage across the surface.
Step 1. Prep the steak for even cooking
Proper prep determines how evenly heat moves through the meat from the moment the steak hits the pan or grill. Skipping this step is one of the most common reasons home cooks end up with a steak that’s perfectly seared on the outside but cold and uneven in the center. Two things matter most here: getting the steak to room temperature before cooking and applying seasoning the right way so the surface develops a proper crust when heat is applied.
Bring the steak to room temperature first
Pull the steak out of the refrigerator 30 to 45 minutes before cooking. A cold steak straight from the fridge creates a wide temperature gap between the surface and the center. The exterior reaches searing temperature quickly while the cold interior needs far longer to catch up, which means you end up burning the outside while chasing 130°F to 135°F in the center.
Pulling the steak from the refrigerator 30 to 45 minutes early is one of the simplest changes you can make when learning how to cook steak to medium with consistent results.
Set the steak on a plate or wire rack at room temperature on your countertop. Avoid covering it tightly with plastic wrap during this window because trapping moisture on the surface actively works against the dry, deeply browned crust you’re building in the next step.
Season generously and dry the surface
Pat both sides of the steak completely dry with paper towels before you season it. Moisture sitting on the surface converts to steam the instant it contacts high heat, and steam prevents browning. A dry surface makes direct contact with the hot pan or grill grate, which is exactly what produces the sear that adds flavor and texture to every bite.
Apply kosher salt and cracked black pepper across the entire surface, covering both sides and the edges with an even, generous coating. A thick cut absorbs a significant amount of seasoning, so use more than you expect. If you have time, season up to an hour ahead and let the salt draw surface moisture out, then allow that moisture to reabsorb back into the meat before you cook. This extra step concentrates flavor noticeably without adding any work at the stove.
Step 2. Cook steak to medium in a pan
Pan-searing gives you precise control over heat and timing, which makes it one of the best methods for knowing exactly how to cook steak to medium without relying on guesswork. A cast iron skillet or heavy stainless pan concentrates heat directly against the meat’s surface, building the deep brown crust that locks in flavor while the interior climbs steadily toward your target temperature of 130°F to 135°F.
Get the pan properly hot before adding the steak
Set your cast iron skillet over medium-high heat for at least two to three minutes before anything goes in. You want the pan surface to reach roughly 400°F to 450°F, which you can check by holding your hand four inches above the pan and feeling significant radiant heat. Add your high-smoke-point oil and let it shimmer and begin moving fluidly across the surface before placing the steak down. If the oil smokes heavily and turns dark immediately, the pan is too hot and the exterior will char before the interior heats through.
A properly preheated pan gives you the sear in the first 30 seconds of contact, which sets the crust without requiring you to press the steak down or move it around.
The pan-sear sequence and timing
Place the steak away from you to avoid oil splatter, then leave it completely undisturbed for the first two to three minutes. Resist the urge to move it. The steak releases naturally from the pan surface once a proper crust forms underneath. Flip it once using tongs, then sear the second side for another two to three minutes depending on your cut’s thickness.
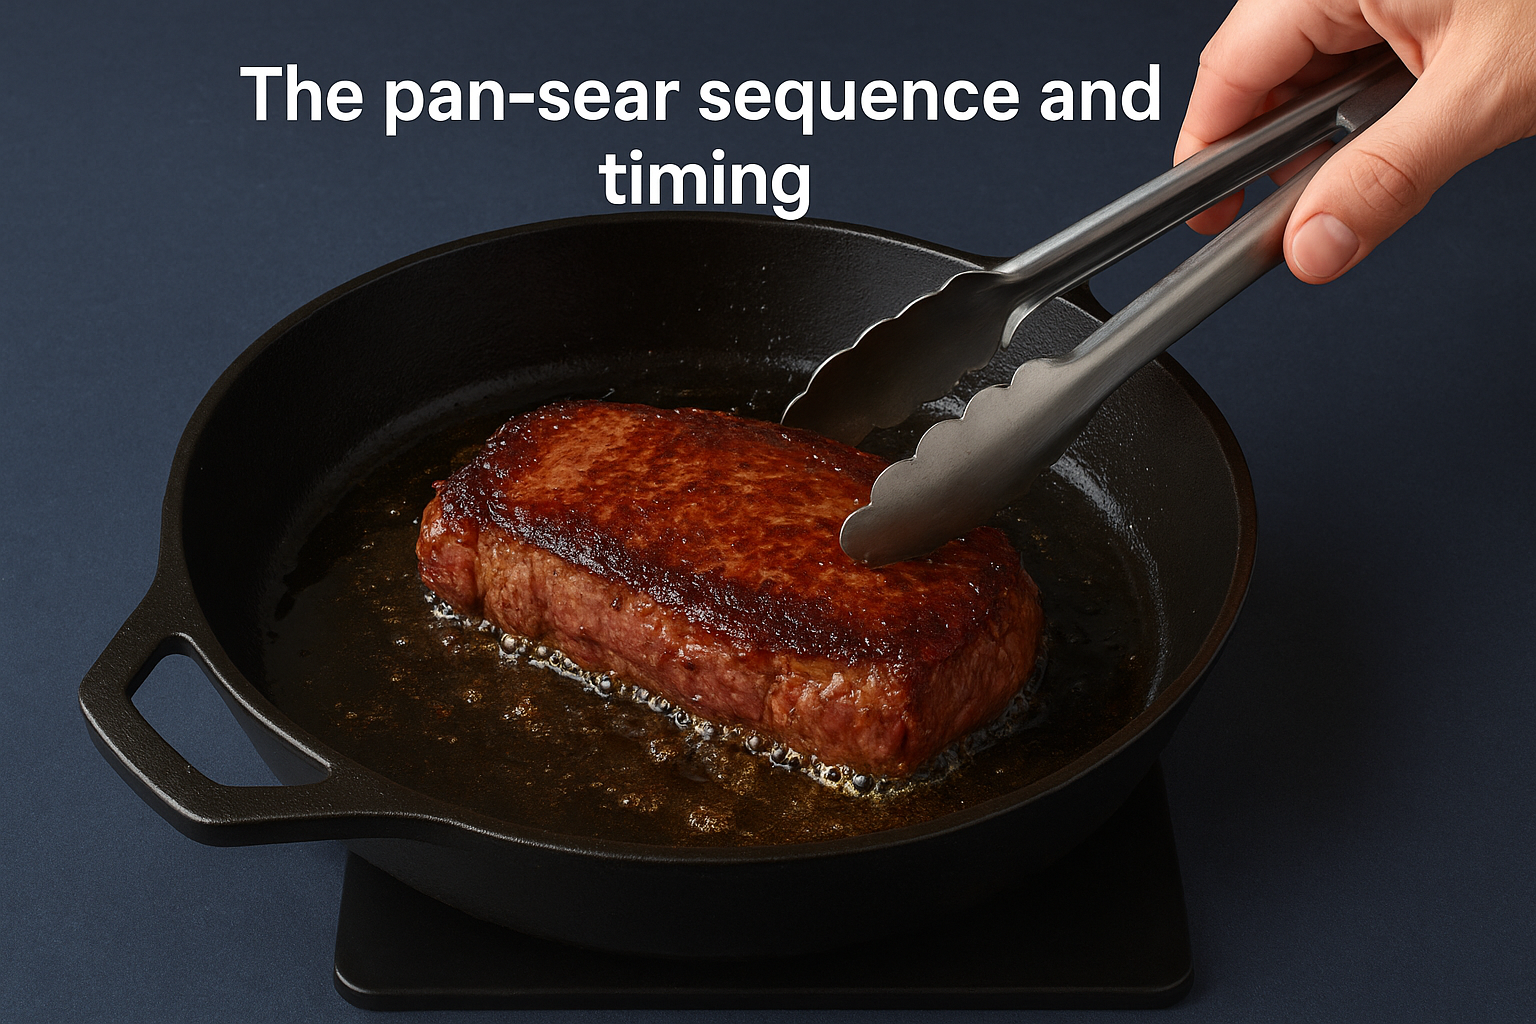
Use the timing guide below for a 1 to 1.5 inch steak cooked over medium-high heat, targeting a pull temperature of 130°F to 135°F:
| Thickness | First Side | Second Side | Baste With Butter |
|---|---|---|---|
| 1 inch | 2-3 min | 2-3 min | Last 60-90 sec |
| 1.25 inches | 3-4 min | 3-4 min | Last 60-90 sec |
| 1.5 inches | 4-5 min | 3-4 min | Last 60-90 sec |
In the final 60 to 90 seconds, add a tablespoon of butter along with crushed garlic and fresh thyme to the pan, tilt it slightly toward you, and spoon the foaming butter continuously over the steak’s surface. This basting step builds flavor and helps the crust finish evenly without pushing the internal temperature past your target.
Step 3. Grill steak to medium without drying it out
Grilling adds a smoky, charred character that a pan can’t fully replicate, but high, direct heat is also where most cooks accidentally dry out a steak or overshoot into medium-well territory. The key to knowing how to cook steak to medium on a grill is building a two-zone fire so you control both searing and finishing heat independently, rather than leaving the steak over a single flame and hoping it cooperates.
Set up a two-zone fire
A two-zone setup means one side of your grill runs at high, direct heat for searing and the other side holds a lower, indirect temperature for finishing the steak once it’s crusted. On a charcoal grill, pile your coals to one side and leave the other side completely empty. On a gas grill, set one or two burners to high and turn the remaining burners to low or off entirely.
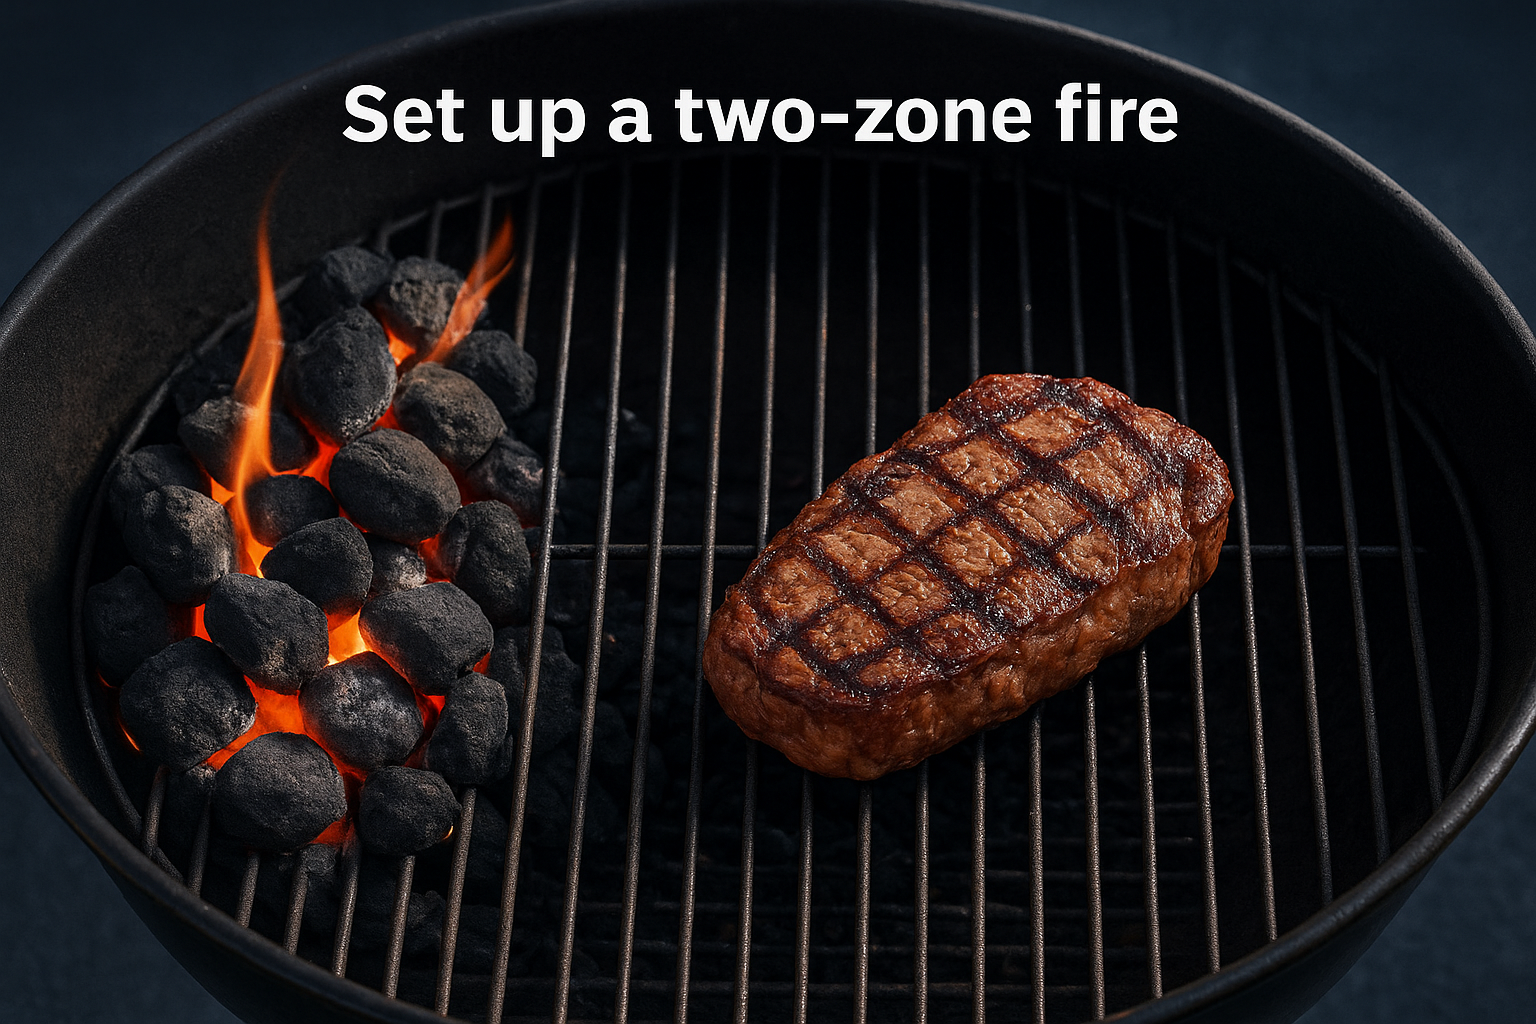
A two-zone setup is the single most reliable way to grill a steak to a specific doneness without burning the outside before the center catches up.
Preheat the grill with the lid closed for 10 to 15 minutes before you put the steak on. The grate itself needs to be hot enough to produce visible grill marks within the first 30 seconds of contact. Brush the grate clean with a wire brush, then oil it lightly using a folded paper towel dipped in vegetable oil and held with tongs. A clean, oiled grate prevents sticking and gives you even contact marks instead of torn, uneven crust.
Grill timing and temperature checks
Place the steak over the direct heat zone first and sear each side for two to three minutes without moving it. Once both sides have a solid crust, move the steak to the indirect zone and close the lid to let heat circulate evenly around the meat until the internal temperature reaches your pull target of 130°F to 135°F. Use the timing guide below as your starting point and confirm every cook with your instant-read thermometer:
| Thickness | Direct Heat (per side) | Indirect Finish | Pull Temp |
|---|---|---|---|
| 1 inch | 2-3 min | 2-4 min | 130-135°F |
| 1.25 inches | 3-4 min | 3-5 min | 130-135°F |
| 1.5 inches | 3-4 min | 5-7 min | 130-135°F |
Wind, outdoor temperature, and grill model all affect actual cooking times, so treat these ranges as a guide rather than a fixed rule. Check the temperature at the two-minute mark of the indirect phase and every minute after that so you catch it before it overshoots.
Step 4. Rest, slice, and serve it at the right moment
Pulling the steak off heat is not the last step. What you do in the four to five minutes after cooking determines whether all the work you put into the sear and temperature control actually pays off at the table. Knowing how to cook steak to medium also means knowing when to stop touching the steak and let the carryover process finish the job.
Why resting isn’t optional
When a steak comes off high heat, the muscle fibers near the surface are still tightly contracted from the intense temperature. The juices inside the meat have been pushed toward the center by that same heat and need time to redistribute evenly throughout the cut before you slice into it. Cut too early, and those juices run straight out onto your cutting board instead of staying inside each slice where they belong.
Rest your steak for at least 5 minutes before slicing; this single step recovers more juiciness than any marinade or basting technique.
Place the steak on a wire rack set over a plate rather than directly on a flat cutting board. A rack allows air to circulate underneath, which prevents the bottom crust from steaming and going soft while the interior finishes redistributing heat. Tent it loosely with foil if your kitchen is cold, but avoid wrapping it tightly because trapped steam softens the crust you worked to build.
How to slice and serve correctly
Slicing direction matters as much as timing. Always cut against the grain, meaning perpendicular to the direction the muscle fibers run across the steak. Cutting with the grain leaves long, intact fibers in each slice that feel chewy and tough even on a perfectly cooked piece of meat. Look at the surface of the steak and identify which direction the lines run before you make your first cut.
Use a sharp carving or chef’s knife and slice in one smooth motion rather than sawing back and forth. Sawing tears the muscle fibers and pushes juice out of the cut surfaces. Serve immediately after slicing onto a warm plate so the steak doesn’t lose temperature before it reaches the table. A cold plate pulls heat out of the meat quickly and undoes the effort of a well-executed rest.
Medium steak time chart by thickness and method
Every cook time range in this guide comes back to two variables: how thick your steak is and which heat source you’re using. This chart consolidates all the timing information from both methods into one reference so you can pull the right numbers quickly without scrolling back through each step. Use it as your starting point every time you’re figuring out how to cook steak to medium, and always confirm the result with your instant-read thermometer rather than relying on time alone.
Time is a guide, not a guarantee; your thermometer is the only tool that tells you when the steak actually hits 130°F to 135°F.
How to read and use the chart
The times below apply to steaks cooked from room temperature, not straight from the refrigerator. If you skipped the 30 to 45 minute resting period before cooking, add one to two minutes to the indirect or finishing phase and check your temperature earlier than the range suggests. The pull temperature column is the number you’re watching on your thermometer, not a number you’re waiting to see on a clock.
| Thickness | Method | Sear (per side) | Finish Phase | Pull Temp |
|---|---|---|---|---|
| 1 inch | Pan | 2-3 min | Baste 60-90 sec | 130-135°F |
| 1 inch | Grill | 2-3 min | 2-4 min indirect | 130-135°F |
| 1.25 inches | Pan | 3-4 min | Baste 60-90 sec | 130-135°F |
| 1.25 inches | Grill | 3-4 min | 3-5 min indirect | 130-135°F |
| 1.5 inches | Pan | 4-5 min | Baste 60-90 sec | 130-135°F |
| 1.5 inches | Grill | 3-4 min | 5-7 min indirect | 130-135°F |
Adjustments that affect your actual cook time
Several factors shift your cook time outside the ranges in the chart, and knowing them in advance prevents you from overcooking a steak because you trusted the clock over the conditions. Bone-in cuts like a T-bone or porterhouse take longer to reach temperature near the bone, so check the temperature in the thickest section away from the bone. The following factors all push your timing toward the longer end of each range or beyond it:
- Grill temperature dropping from wind or a cold outdoor environment
- Bone-in cuts that insulate heat near the center
- Steaks thicker than 1.5 inches that need an extended indirect finish
- A pan that wasn’t fully preheated before the steak went in
Wrap it up and cook with confidence
Knowing how to cook steak to medium comes down to three repeatable actions: pull the steak from the fridge early, use an instant-read thermometer to hit 130°F to 135°F before you take it off heat, and rest it for at least five minutes before slicing. Every other detail in this guide supports those three steps. Get those right, and you’ll stop second-guessing every steak you cook.
Practice the method a few times and the timing becomes instinctive. Thickness, heat source, and resting time are the only variables you’re ever adjusting, and the chart in the previous section handles the math for you. Cut against the grain, serve on a warm plate, and the result speaks for itself.
If you’d rather leave the ribeye to someone else, visit La Dolce Vita Cucina in Chicago’s Portage Park and let our kitchen handle it for you.