
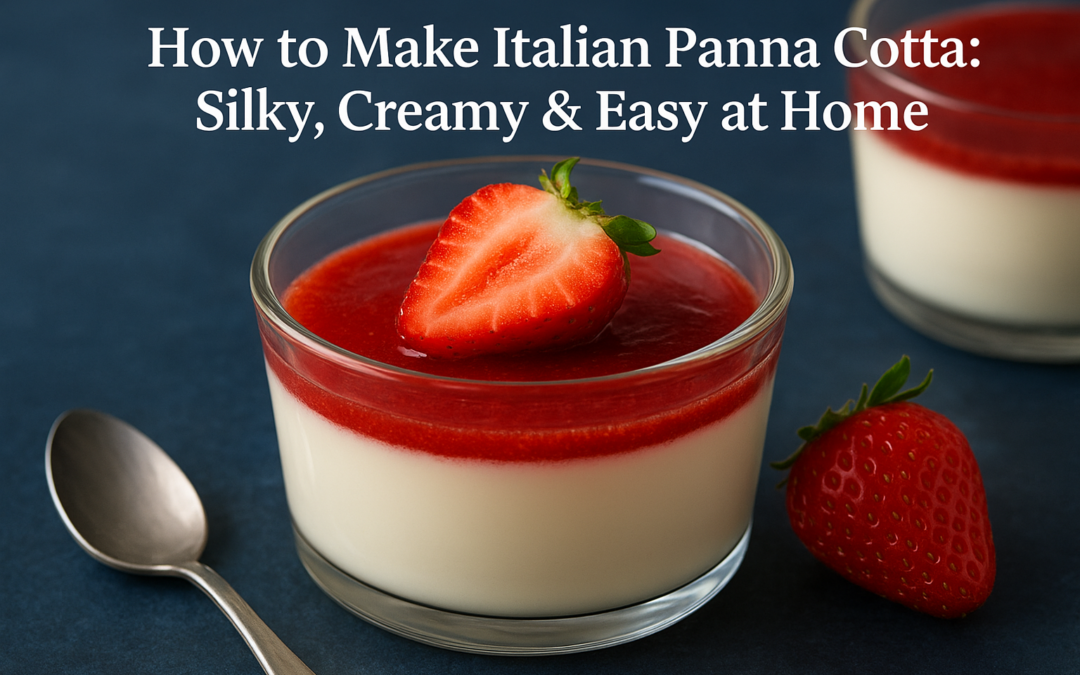
Panna cotta might just be the most elegant Italian dessert you can make with minimal effort. Learning how to make Italian panna cotta at home opens the door to a classic that rivals what you’d find at fine restaurants, silky, creamy, and impossible to resist. At La Dolce Vita Cucina, we celebrate authentic Italian flavors every day in our Portage Park kitchen, and we know firsthand how satisfying it is to nail this traditional recipe.
The secret to perfect panna cotta lies in balance, the right ratio of cream to milk, the precise amount of gelatin, and a gentle hand during preparation. Too much gelatin and you get rubber. Too little and it collapses on the plate. Get it right, and you have a dessert that wobbles beautifully and melts on your tongue.
This guide walks you through every step, from ingredient selection to unmolding techniques. Whether you’re preparing a weeknight treat or an impressive dinner party finale, you’ll have the confidence to create restaurant-quality panna cotta in your own kitchen.
What Italian panna cotta is and how it should feel
Panna cotta translates to "cooked cream" in Italian, and that’s exactly what you create when you master how to make Italian panna cotta. This Piedmont-born dessert combines heavy cream, milk, sugar, and gelatin into a silky custard that sets without eggs or baking. You heat the dairy gently, bloom the gelatin, then pour the mixture into molds and refrigerate until it transforms into a delicate, spoonable dessert that holds its shape yet melts instantly on your palate.
The texture separates a proper panna cotta from imitators. When you unmold it onto a plate, the dessert should wobble gently like a perfectly ripe peach, not stand rigid like a rubber eraser. You want just enough structure to maintain its dome shape while remaining tender enough to slice cleanly with a spoon. The mouthfeel should feel luxurious and creamy without any graininess or bounce.
A properly set panna cotta trembles when you tap the plate but never loses its elegant shape.
Traditional Italian panna cotta sits somewhere between a firm yogurt and a soft custard. You achieve this balance by using exactly the right amount of gelatin, typically around 2 to 2.5 teaspoons of powdered gelatin per quart of liquid. Too much creates a bouncy, artificial texture that belongs in a hospital cafeteria, not on your dinner table. Too little leaves you with a soupy mess that pools across the plate instead of standing proud.
The perfect wobble vs. firm set
The wobble test tells you everything about your panna cotta’s success. After chilling for at least four hours, you should be able to gently shake the mold and see the surface shimmer and ripple like a calm pond disturbed by a single raindrop. If it stays completely still, you’ve added too much gelatin and created a rubbery disaster. If it sloshes around like liquid, you haven’t used enough.
You want the dessert to hold together when you run a knife around the edge and invert it onto a serving plate. A perfect panna cotta releases cleanly and maintains its dome shape, but the moment your spoon cuts through, it should offer almost no resistance. Think of slicing through cold butter that’s been sitting at room temperature for ten minutes, not carving into a hard block straight from the fridge.
Traditional versus modern interpretations
Classic Italian panna cotta keeps flavoring simple, often just a vanilla bean or a hint of citrus zest to complement the pure dairy flavor. The cream-to-milk ratio typically lands around 2:1, giving you richness without overwhelming heaviness. You’ll find this version in trattorias across northern Italy, served plain or with a simple berry compote that doesn’t compete with the dessert’s delicate nature.
Modern variations have expanded the flavor palette considerably. Chefs now infuse the dairy base with everything from espresso and chocolate to lavender and rose water. Some recipes swap half the cream for buttermilk to add tang, while others incorporate coconut milk for a dairy-free alternative. These adaptations can work beautifully, but they stray from the traditional approach that lets pure cream flavor shine through every bite.
The serving style has evolved too. Traditional panna cotta gets unmolded onto individual plates and dressed with fresh fruit or caramel. Contemporary presentations sometimes keep the dessert in clear glass cups or ramekins, layering it with compotes or creating striped patterns with different flavors. Both approaches have merit, though purists argue that unmolding proves you’ve nailed the texture perfectly.
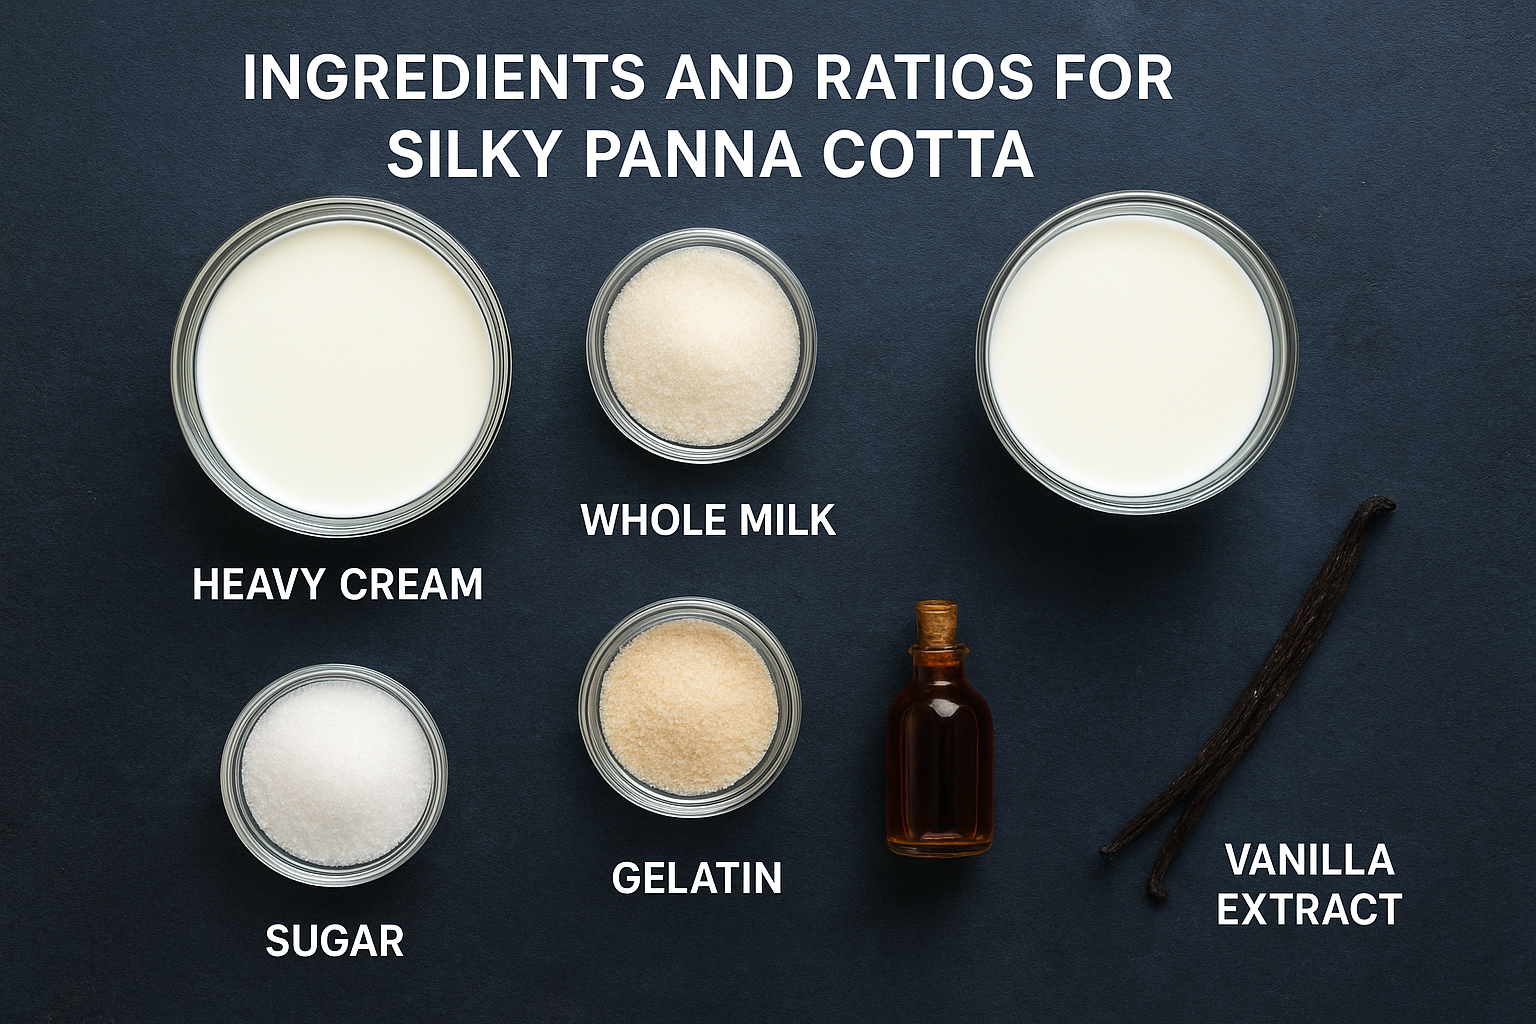
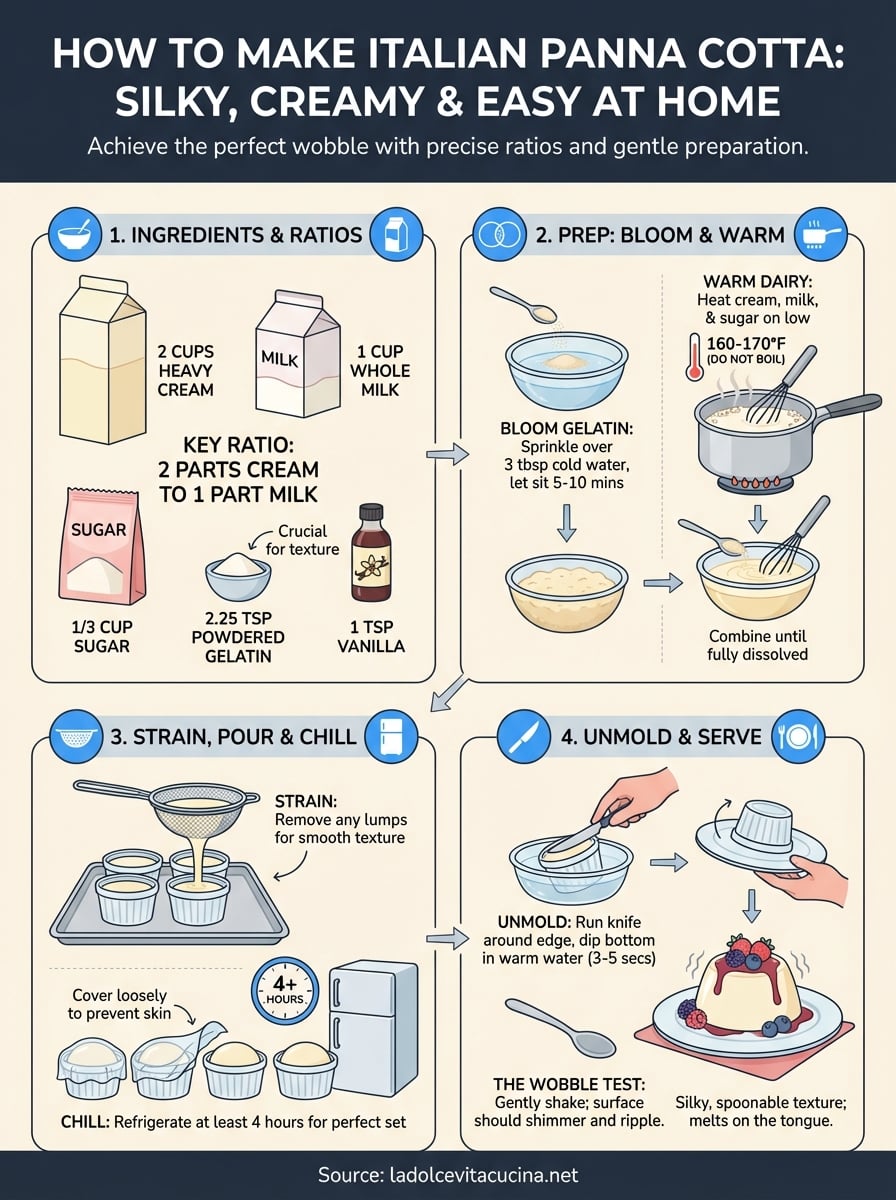
Ingredients and ratios for silky panna cotta
The foundation of how to make Italian panna cotta starts with getting your ratios right before you even turn on the stove. You need only five essential ingredients: heavy cream, whole milk, granulated sugar, unflavored gelatin, and vanilla. The magic happens when you combine these elements in precise proportions that create structure without stiffness. Most failed panna cotta attempts trace back to guessing these measurements instead of following proven ratios that deliver consistent results.
Core ingredient measurements
For a standard recipe serving six to eight people, you’ll work with two cups of heavy cream and one cup of whole milk. This 2:1 cream-to-milk ratio gives you richness while preventing the dessert from feeling heavy or coating your mouth like butter. You’ll add one-third cup of granulated sugar to balance the dairy’s natural savory notes without making the dessert cloying.
The gelatin measurement matters most. You need exactly 2.25 teaspoons of powdered unflavored gelatin for three cups of liquid. This translates to roughly one standard packet plus a quarter teaspoon more. Under-measure and your panna cotta collapses. Over-measure and you create something closer to flavored rubber bands than a proper dessert.
| Ingredient | Amount | Purpose |
|---|---|---|
| Heavy cream | 2 cups | Richness and body |
| Whole milk | 1 cup | Lightens texture |
| Sugar | 1/3 cup | Sweetness balance |
| Gelatin | 2.25 tsp | Sets without firmness |
| Vanilla extract | 1 tsp | Classic flavor |
Quality matters for cream and milk
Your cream should contain at least 36% milk fat for proper texture and flavor. Anything labeled "light cream" or "half-and-half" won’t give you the silky mouthfeel that defines excellent panna cotta. Check the label and avoid ultra-pasteurized cream when possible, as the high-heat processing can affect how smoothly the dessert sets and sometimes creates a slightly cooked taste that competes with the vanilla.
Using fresh, minimally processed dairy products transforms your panna cotta from good to restaurant-quality.
Whole milk contributes structure without diluting the cream’s richness. You can substitute 2% milk in a pinch, but skim milk leaves the dessert tasting thin and watery. The fat content in whole milk helps carry flavor and creates the characteristic wobble you’re aiming for when you unmold the finished dessert onto your serving plates.
Tools, molds, and prep for clean release
You don’t need specialized equipment to master how to make Italian panna cotta, but having the right tools makes the process smoother and helps you achieve that perfect unmolding every time. The setup takes less than five minutes once you gather your basics, and most items already live in your kitchen. You’ll want containers that distribute heat evenly, tools that let you measure precisely, and molds that release cleanly without destroying your carefully set dessert.
Essential kitchen tools
Your panna cotta toolkit starts with a medium saucepan that holds at least two quarts and conducts heat evenly across the bottom. Thin, cheap pans create hot spots that can scorch the cream before the sugar dissolves completely. You also need a fine-mesh strainer to catch any skin that forms on the dairy or undissolved gelatin bits that would ruin the silky texture. A whisk helps incorporate ingredients smoothly, while measuring spoons and cups ensure your ratios stay accurate.
Keep these items ready before you start:
- Medium heavy-bottomed saucepan (2+ quart capacity)
- Fine-mesh strainer or chinois
- Small bowl for blooming gelatin
- Whisk for combining ingredients
- Liquid measuring cup with pour spout
- Digital or instant-read thermometer (optional but helpful)
- Ladle or large spoon for transferring liquid
Choosing and preparing molds
Traditional panna cotta uses individual ramekins or dariole molds that hold four to six ounces each, creating single servings that unmold into perfect domes. You can also use small bowls, silicone molds, or even clean coffee cups if you plan to serve the dessert directly in the container instead of unmolding. Metal molds release more cleanly than ceramic because they warm slightly when you dip them in hot water, but ceramic ramekins work fine if you prepare them properly.
Lightly oiling your molds before filling prevents sticking and ensures clean release every time.
Prep your molds before you heat the dairy. Pour about half a teaspoon of neutral oil (grapeseed, vegetable, or even light olive oil) into each mold, then use a pastry brush or paper towel to coat the entire interior surface with a thin, even layer. You want just enough oil to prevent sticking without creating visible pools or streaks that would mar your finished dessert. This step takes thirty seconds per mold and saves you from serving broken, stuck panna cotta that refuses to slide onto your plates.
Step-by-step: bloom gelatin and warm the dairy
The actual process of how to make Italian panna cotta begins with two simultaneous tasks that take about ten minutes total. You’ll bloom your gelatin in cold liquid while gently warming the cream and milk mixture on the stove. These steps happen in parallel, which means you can prepare the gelatin first, then start heating your dairy while the gelatin softens. Getting both elements ready at the same time streamlines the process and ensures your gelatin dissolves completely when you combine everything.
Bloom the gelatin properly
Pour three tablespoons of cold water or milk into a small bowl and sprinkle your measured gelatin evenly across the surface. Don’t dump it in one clump, as the powder will form a solid mass that won’t hydrate properly. Let the mixture sit undisturbed for five to ten minutes while the gelatin absorbs the liquid and swells to roughly triple its original volume. You’ll notice the texture changes from dry powder to a thick, spongy mass that looks almost solid.
Properly bloomed gelatin dissolves instantly in warm dairy and creates the smooth texture that defines excellent panna cotta.
The blooming step hydrates the gelatin molecules so they dissolve smoothly without leaving grainy bits or lumps in your finished dessert. Skipping this process or rushing it creates texture problems you can’t fix later. Your bloomed gelatin should look like wet sand or thick jelly when you’re ready to add it to the warm cream mixture.
Heat dairy to the right temperature
Combine your cream, milk, and sugar in the saucepan over medium-low heat, stirring occasionally with your whisk. You want the mixture to warm gradually and the sugar to dissolve completely, which takes about five to seven minutes. Watch for small bubbles forming around the edges of the pan and steam rising from the surface, both signs that you’ve reached the right temperature without boiling.
Pull the pan off the heat when you see the first wisps of steam. The mixture should register around 160 to 170 degrees Fahrenheit if you’re using a thermometer, hot enough to melt the gelatin but not so hot that it damages the protein structure. You’ll add your bloomed gelatin directly to this warm dairy in the next step, whisking until every trace disappears and you have a completely smooth, unified liquid ready for straining and pouring into your prepared molds.
Step-by-step: strain, pour, chill, and unmold
The final stages of how to make Italian panna cotta involve transferring your warm dairy mixture into molds, letting it set completely, then releasing each dessert onto a serving plate without breaking the delicate structure. These steps require patience more than skill, but rushing through them creates texture problems or broken desserts that refuse to unmold cleanly. You’ve already done the hard work with your gelatin and dairy, so now you just need to follow the process carefully and give your panna cotta the time it needs to transform from liquid to that signature wobble.
Strain and pour into molds
Pour your warm dairy mixture through the fine-mesh strainer into a large measuring cup or bowl with a spout. This removes any skin that formed on the surface during heating, undissolved gelatin bits, or vanilla bean seeds if you used a whole pod. You want completely smooth liquid that will set into a flawless, creamy texture without any grainy spots or pieces that catch on your tongue.
Fill each prepared mold slowly, pouring down the side rather than straight into the center to minimize bubbles on the surface. Leave about a quarter inch of space at the top of each container. If you see foam or bubbles forming, skim them off with a spoon or pop them gently with a toothpick before the mixture begins to set.
Chill timing and temperature
Transfer your filled molds to the refrigerator and let them chill for at least four hours, though overnight works even better for firm, confident unmolding. The gelatin needs this time to fully activate and create the structure that holds your panna cotta together. Keep the molds on a flat surface where they won’t tip or get jostled, and cover them loosely with plastic wrap after the first hour to prevent them from absorbing refrigerator odors.
Proper chilling time separates panna cotta that unmolds perfectly from desserts that collapse into puddles on your plates.
Your refrigerator should stay between 35 and 40 degrees Fahrenheit for optimal setting. Warmer temperatures slow the process, while colder ones can create ice crystals that damage the texture.
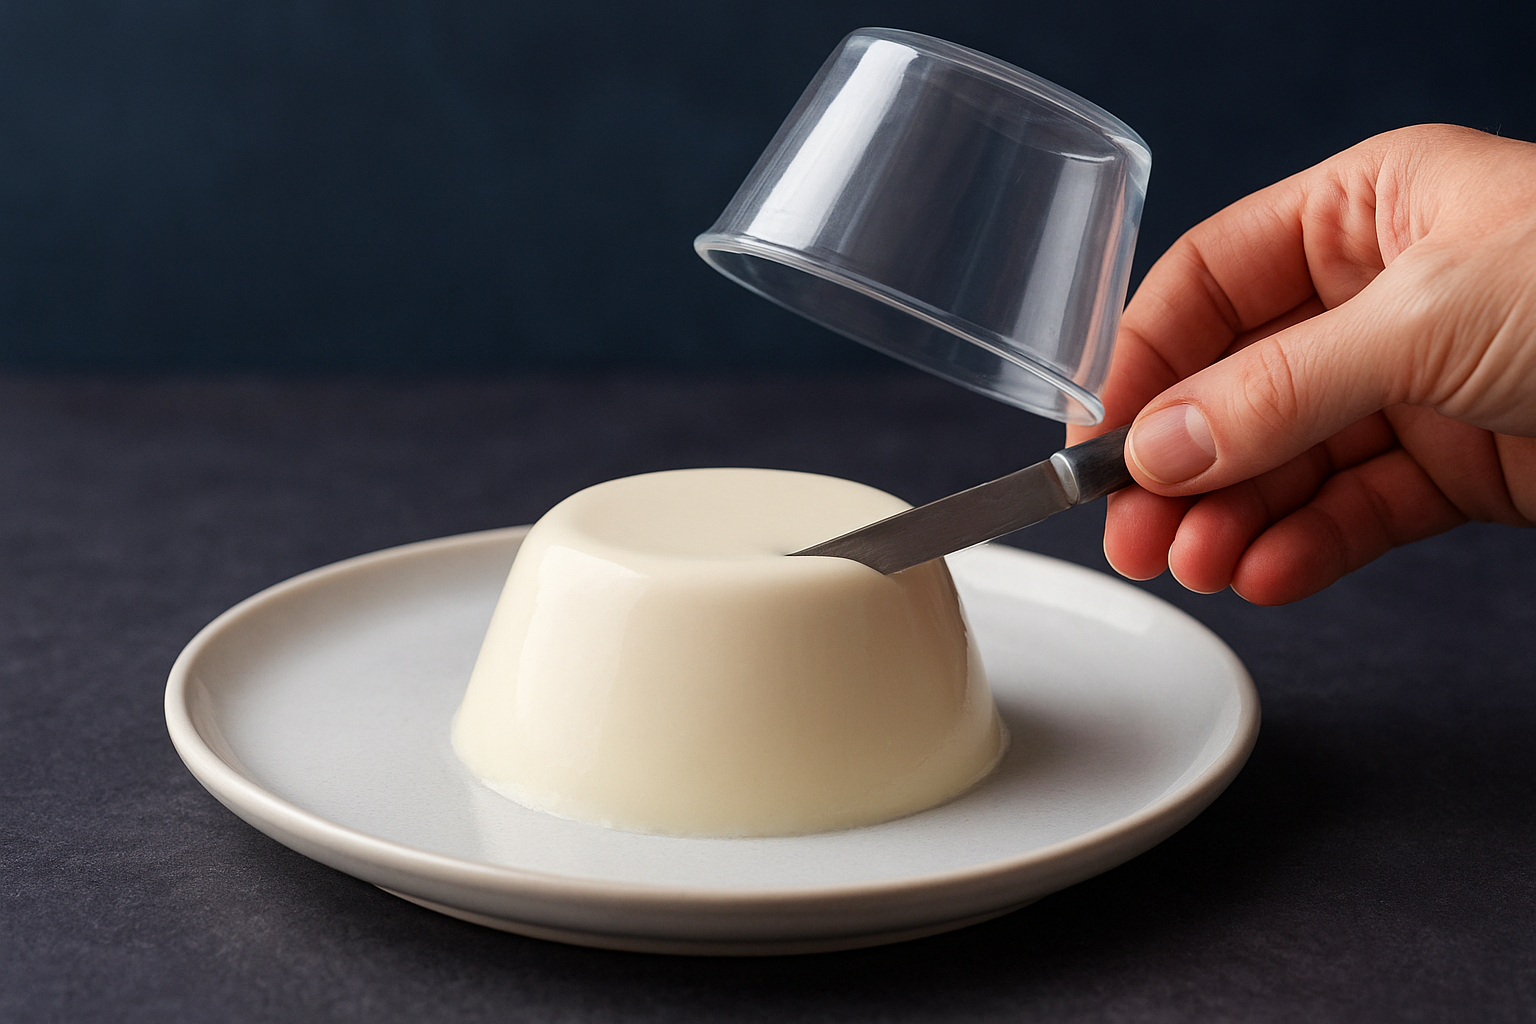
Unmold onto serving plates
Run a thin knife around the inside edge of each mold, pressing gently against the container rather than the dessert. Dip the bottom of the mold in hot water for three to five seconds, just long enough to warm the exterior without melting the panna cotta inside. Place your serving plate upside down on top of the mold, then flip everything over in one quick motion while holding both pieces together. Give the mold a gentle shake and the dessert should slide out cleanly onto the plate, maintaining its dome shape perfectly.
Troubleshooting, swaps, and flavor ideas
Even experienced cooks encounter problems when learning how to make Italian panna cotta, but most issues trace back to a handful of fixable mistakes. Your dessert might set too firm, refuse to unmold, or collapse into a puddle when you flip it onto the plate. Understanding what went wrong helps you adjust your technique for the next batch and saves you from repeating the same errors. You can also customize the basic recipe by swapping ingredients or adding flavors that complement the creamy base without overpowering its delicate nature.
Common texture problems and fixes
When your panna cotta sets too firm and bounces like rubber, you’ve added too much gelatin or let the mixture boil instead of just warming it. Cut back by a quarter teaspoon next time and watch your temperature more carefully. If the dessert collapses or stays soupy, you didn’t use enough gelatin or didn’t chill it long enough. Check that your gelatin hasn’t expired, as old powder loses its setting power over time.
Adjusting gelatin by just a quarter teaspoon makes the difference between perfect wobble and complete failure.
Grainy texture usually means you didn’t bloom the gelatin properly or added it to dairy that was too cool to dissolve the granules completely. Make sure your cream mixture steams before adding the bloomed gelatin, then whisk vigorously for thirty seconds. Skin forming on top during chilling happens when you don’t cover the molds, so drape plastic wrap loosely over each container after the first hour in the refrigerator.
Ingredient substitutions that work
You can swap half the heavy cream for full-fat buttermilk or sour cream to add tang without changing the texture. This substitution works especially well with berry toppings that benefit from slight acidity. For a lighter version, use equal parts cream and whole milk instead of the 2:1 ratio, though you’ll sacrifice some richness. Replace granulated sugar with honey or maple syrup by using three tablespoons instead of a third cup, and add these sweeteners while the dairy warms so they dissolve completely.
Sheet gelatin substitutes for powdered at a ratio of two sheets per teaspoon, bloomed in cold water for five minutes before squeezing out excess liquid. Agar agar creates a vegan version using one and a half teaspoons per three cups of liquid, though the texture leans slightly firmer than traditional gelatin-set panna cotta.
Classic and creative flavor variations
Traditional vanilla gets infused by steeping a split vanilla bean in the warming cream for ten minutes, then scraping the seeds into the mixture. For coffee panna cotta, add two tablespoons of instant espresso powder to the warm dairy. Chocolate versions need a third cup of chopped dark chocolate whisked in until smooth.
Try these flavor combinations:
- Lemon zest and lavender (one tablespoon zest, half teaspoon dried lavender)
- Earl Grey tea (steep three tea bags in warm cream for five minutes)
- Coconut (replace one cup cream with full-fat coconut milk)
- Cardamom and rose water (half teaspoon ground cardamom, one teaspoon rose water)
Quick wrap-up
You now have everything you need to create authentic Italian panna cotta at home with confidence. The technique breaks down into simple, manageable steps that take less than twenty minutes of active work, followed by a few hours of hands-off chilling time. Your success depends on precise gelatin measurements, gentle heating, and proper blooming, all techniques you can master in one or two attempts.
Start with the classic vanilla version to nail the fundamental texture and wobble before experimenting with flavor variations. Once you understand how to make Italian panna cotta properly, you’ll find yourself reaching for this recipe whenever you need an impressive dessert that doesn’t require hours in the kitchen or advanced pastry skills.
When you’re ready to experience authentic Italian cuisine without the work, visit us at La Dolce Vita Cucina in Portage Park. Our kitchen serves traditional Italian desserts alongside fresh pasta, premium steaks, and house-made gelato in a welcoming atmosphere that celebrates the sweet life.