
Golden, crispy on the outside and filled with creamy risotto on the inside, if you’ve ever wondered what are arancini balls, you’re about to discover one of Sicily’s most beloved culinary treasures. These fried rice balls have been satisfying appetites across Italy for centuries, and they’ve earned their place on menus from Rome to right here in Chicago’s Portage Park neighborhood.
At La Dolce Vita Cucina, we celebrate authentic Italian dishes that bring people together around the table. Arancini represent exactly what we love about Italian cooking: simple ingredients transformed into something extraordinary through technique and tradition.
This guide covers everything you need to know about arancini, from their origins in Southern Italy to the ingredients that make them irresistible, plus practical tips on preparation and serving. Whether you’re planning to make them at home or simply want to appreciate these golden spheres when dining out, you’ll find the answers here.
What are arancini balls
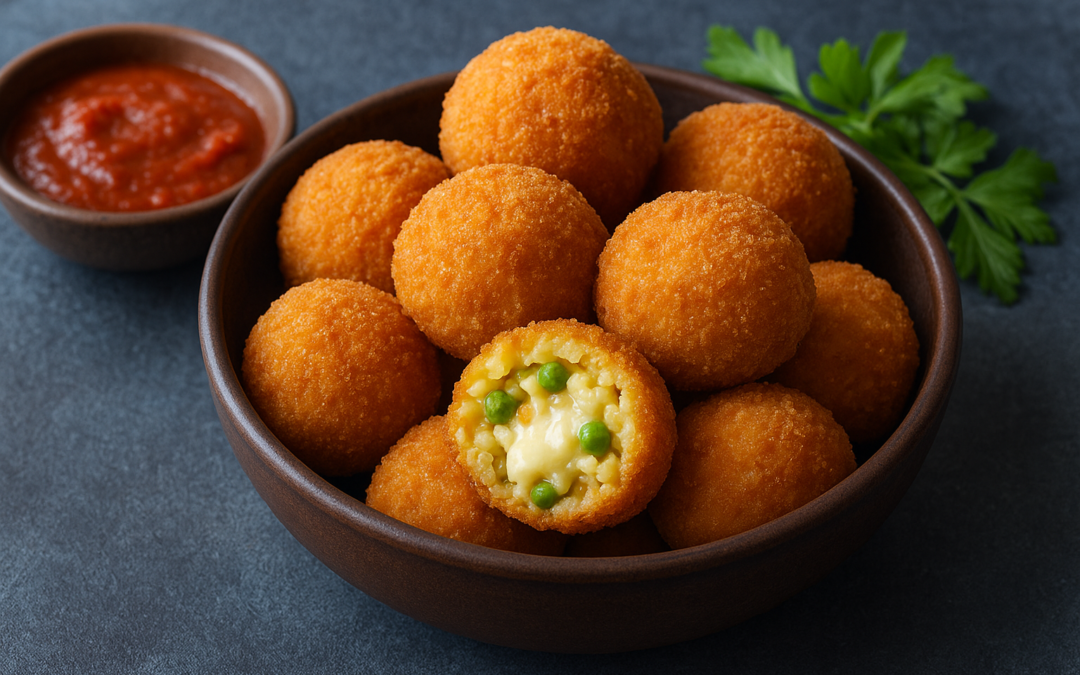
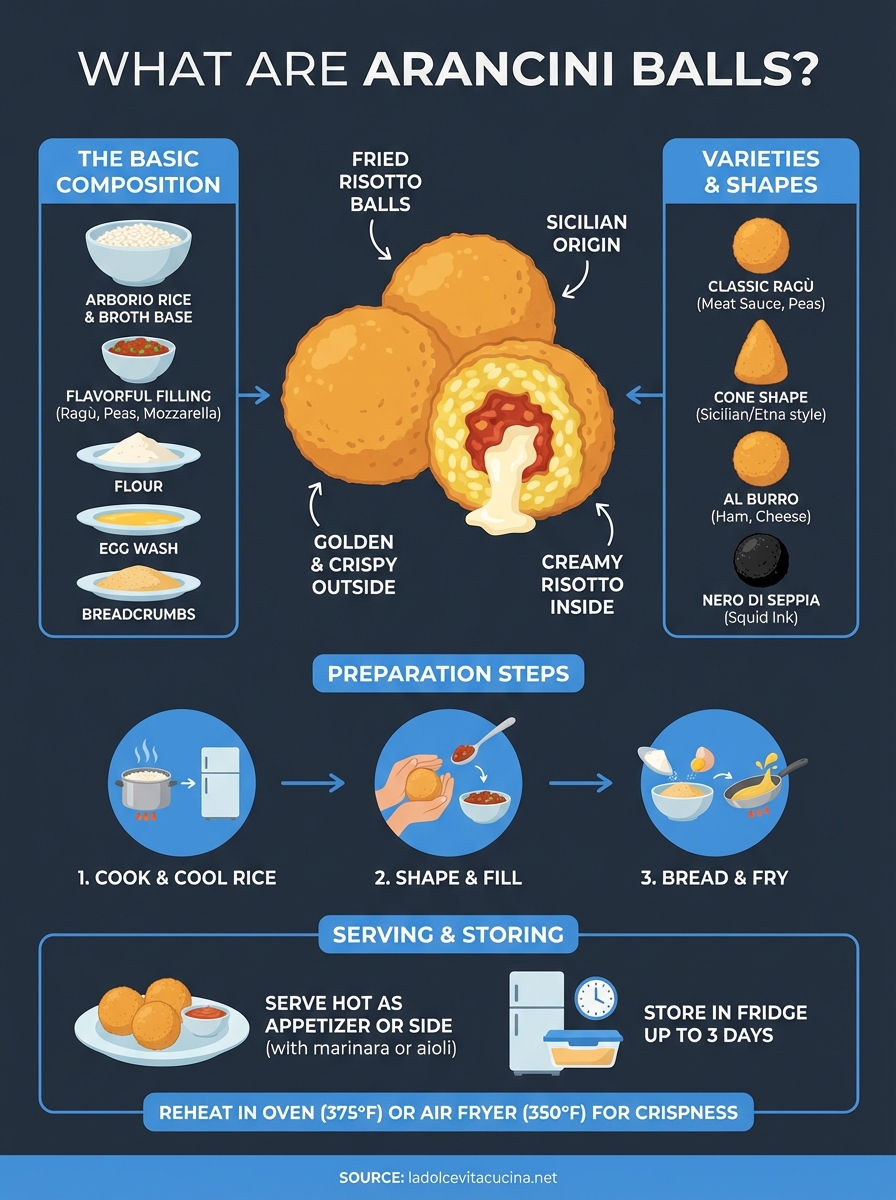
Arancini balls are fried rice balls made from cooked risotto that’s been shaped into spheres, filled with savory ingredients, coated in breadcrumbs, and deep-fried until golden and crispy. The name comes from the Italian word for "little oranges" because of their distinctive round shape and golden color after frying. You’ll find them served as appetizers, street food, or side dishes throughout Italy, particularly in Sicily where they originated.
The basic composition
Each arancini ball starts with arborio rice that’s been cooked in a flavorful broth to create a creamy, risotto-like base. Once the rice cools, you shape it around a filling, which traditionally includes ragù (meat sauce), peas, and mozzarella cheese. The shaped ball then gets coated in flour, dipped in beaten egg, and rolled in breadcrumbs before hitting hot oil for frying. This three-step breading process creates the signature crispy exterior that contrasts beautifully with the creamy rice inside.
The magic of arancini lies in the contrast between the crunchy golden shell and the soft, savory center that stays warm and melting.
The size typically ranges from baseball to tennis ball proportions, making them substantial enough to serve as a meal or perfect for sharing as an appetizer. Professional kitchens often prepare the rice a day ahead, which makes it easier to handle and shape without the mixture falling apart. You’ll notice that properly made arancini hold their shape perfectly when you bite into them, revealing distinct layers of rice, filling, and coating.
Different varieties you’ll encounter
Regional variations across Sicily and mainland Italy have created dozens of arancini styles, each with distinct fillings and shapes. Understanding these differences helps you know what to expect when ordering and inspires options if you’re making them at home.

Traditional varieties include:
- Arancini al ragù – The classic version with meat sauce, peas, and mozzarella
- Arancini al burro – Filled with ham, mozzarella, and béchamel sauce (butter style)
- Arancini con spinaci – Vegetarian option with spinach and cheese
- Arancini al pistacchio – Sicilian specialty featuring pistachio cream and mortadella
- Arancini al nero di seppia – Made with squid ink rice for a dramatic black appearance
Some regions shape arancini into cones rather than balls, particularly in eastern Sicily where they prefer this pointed form. Modern interpretations now include everything from seafood fillings to four-cheese combinations, but the core concept remains the same: seasoned risotto formed around a flavorful center, breaded, and fried to perfection.
Where arancini come from
Arancini trace their origins to 10th-century Sicily when the island was under Arab rule. Arab traders and settlers brought rice cultivation techniques to the region, along with the practice of coating and frying rice-based dishes. The Sicilians adapted these methods to create what would become arancini, initially as a practical way to preserve and transport cooked rice during travel or for field workers who needed portable meals that stayed fresh throughout the day.
Sicily’s role in creating arancini
The exact birthplace remains debated, but most food historians point to Palermo and the surrounding western regions as the likely origin point. Early versions served as convenient street food during festivals and religious celebrations, particularly around Santa Lucia’s feast day on December 13th, when Sicilians traditionally avoid bread and pasta in honor of the saint who saved them from famine.
You’ll find that the cone shape popular in Catania and eastern Sicily represents Mount Etna, the active volcano that dominates the region’s landscape. This regional pride in shaping reflects how deeply arancini connect to Sicilian identity and local geography. The practice of forming rice around a meat filling likely evolved from similar Middle Eastern techniques of stuffing and frying various grains.
Sicilian cooks transformed a simple preservation method into an art form that has endured for over a thousand years.
How arancini spread beyond Sicily
Arancini gained popularity throughout mainland Italy during the 19th and 20th centuries as Sicilian immigrants brought their culinary traditions to Rome, Naples, and northern cities. You can now find variations in almost every Italian region, though purists argue that only Sicilian versions deserve the authentic label.
The global spread accelerated after World War II when Italian immigrants introduced arancini to the United States, Australia, and South America. Today, when you ask what are arancini balls in Chicago or New York, you’re connecting to this centuries-long journey from Arab-influenced Sicily to modern Italian-American cuisine served in neighborhoods like Portage Park.
What goes in arancini balls
Understanding the ingredient layers helps you appreciate the complexity behind what are arancini balls and guides you whether you’re ordering them or planning to make them yourself. Each component plays a specific role in creating the final texture and flavor profile that makes these fried rice balls so satisfying.
The rice base and liquid components
You need arborio rice or another short-grain Italian variety that releases enough starch to hold the ball together when shaped. This rice cooks in a savory broth made from chicken, beef, or vegetable stock, often flavored with saffron threads that add both color and a subtle earthy taste. Some recipes include white wine, butter, and grated Parmigiano-Reggiano cheese mixed directly into the rice for extra richness and binding power.
The liquid-to-rice ratio matters because you want the final mixture creamy enough to stick together but firm enough to shape without falling apart. Professional kitchens typically use two parts broth to one part rice, adjusting as needed based on how absorbent the specific rice variety proves during cooking.
The filling options
Traditional arancini center on beef or pork ragù combined with peas and cubed mozzarella, which melts during frying to create that satisfying cheese pull when you bite in. The meat sauce should be thick and concentrated rather than soupy, preventing the filling from making the rice soggy or breaking through the coating during the frying process.
Popular filling combinations include:
- Classic meat ragù with peas and mozzarella
- Ham, mozzarella, and béchamel sauce
- Spinach, ricotta, and Parmigiano-Reggiano
- Mushrooms with fontina cheese
- Spicy sausage with provolone
- Eggplant caponata (vegetarian option)
The filling should complement rather than overpower the seasoned rice that surrounds it.
The coating layers
The breading system requires all-purpose flour, beaten eggs, and fine breadcrumbs applied in that specific order. You roll each shaped ball first in flour to create a dry surface, then dip it in egg wash to provide adhesion, and finally coat it thoroughly in breadcrumbs that crisp up during frying. Using Italian-style breadcrumbs or panko creates the crunchiest exterior texture that contrasts perfectly with the creamy interior.
How to make arancini balls at home
Making arancini requires patience and technique, but you can master the process with proper preparation and attention to detail. You’ll need to plan ahead because the rice must cool completely before shaping, which means starting at least 4 hours before serving or preparing the rice base the day before. This advance timing actually makes the rice easier to handle and prevents the balls from falling apart during breading and frying.
Preparing the rice base
You start by cooking 2 cups of arborio rice in 4 cups of chicken or vegetable broth over medium heat, stirring frequently as the liquid absorbs. Add a pinch of saffron threads, 2 tablespoons of butter, and 1/2 cup of grated Parmigiano-Reggiano once the rice reaches a creamy consistency. The mixture should look like thick risotto that holds together when you stir it.
Spread the cooked rice on a large baking sheet in a thin layer to cool faster, then refrigerate for at least 2 hours. Cold rice firms up and becomes much easier to shape without sticking to your hands. While the rice chills, prepare your filling by heating 1 cup of meat ragù with 1/2 cup of peas until thick, then let it cool completely.
Essential ingredients you’ll need:
- 2 cups arborio rice
- 4 cups broth (chicken or vegetable)
- 1 cup meat ragù or other filling
- 4 oz mozzarella, cubed
- 2 cups breadcrumbs
- 3 eggs, beaten
- 1 cup all-purpose flour
- Vegetable oil for frying
Shaping and filling the balls
You form each arancini by taking 1/3 cup of cold rice in your dampened palm, pressing it flat, then adding a spoonful of filling and a mozzarella cube in the center. Cup your hands around the rice and roll it into a smooth ball, making sure the filling stays completely enclosed. Repeat until you’ve used all the rice, which typically yields 8 to 10 arancini balls depending on size.
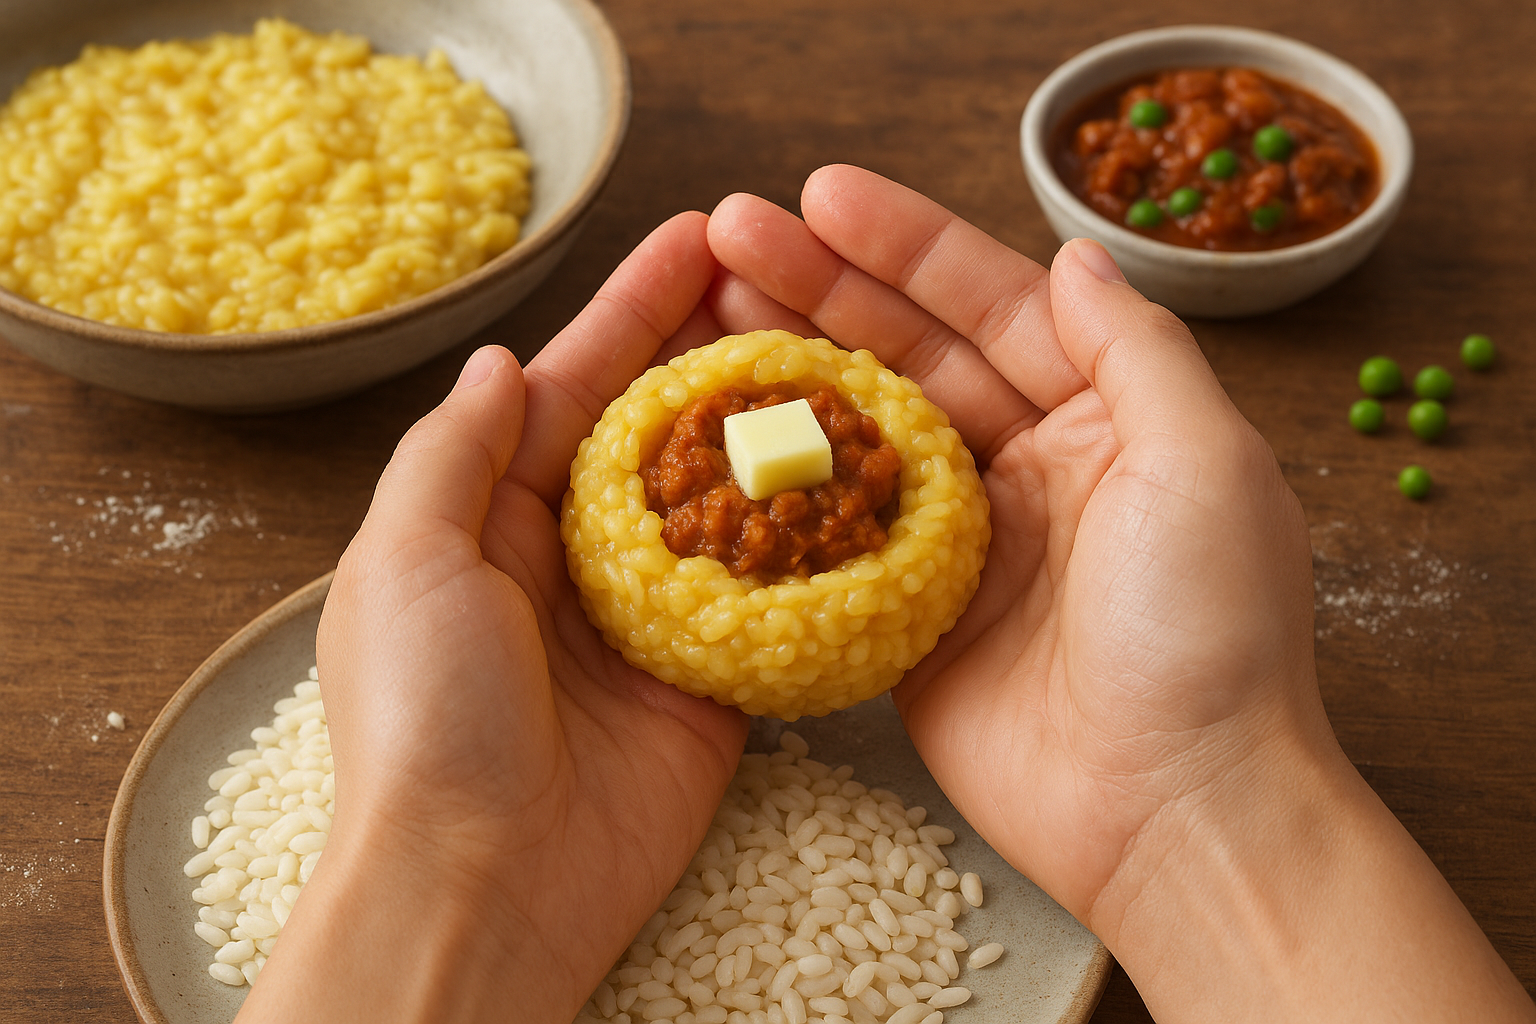
The key to perfect shaping is keeping your hands slightly damp, which prevents sticking without making the rice too wet.
Frying to golden perfection
Heat 3 inches of vegetable oil to 350°F in a deep pot or heavy-bottomed pan, using a thermometer to maintain consistent temperature. Roll each ball in flour, dip it in beaten egg, then coat thoroughly with breadcrumbs before carefully lowering it into the hot oil. Fry 3 to 4 balls at a time for 4 to 5 minutes, turning occasionally until they turn deep golden brown on all sides.
How to serve, store, and reheat arancini
You should serve arancini while they’re still hot and crispy from the fryer, ideally within 5 to 10 minutes of cooking when the cheese inside remains melted and the coating stays at its crunchiest. Place them on paper towels for 30 seconds to absorb excess oil, then transfer to a serving platter lined with parchment paper to maintain the crispy texture underneath.
Serving suggestions and pairings
Arancini work best as appetizers or side dishes alongside a simple green salad dressed with olive oil and lemon. You can serve them with marinara sauce, aioli, or pesto for dipping, though traditional Sicilian versions often need no accompaniment because the filling provides enough flavor. Setting out toothpicks makes them easier for guests to handle at parties or gatherings.
Common serving contexts include:
- Appetizer course before a pasta or meat entrée
- Cocktail hour finger food
- Lunch paired with soup or salad
- Street food style wrapped in paper
The best time to enjoy arancini is immediately after frying when the temperature contrast between hot rice and melted cheese reaches its peak.
Storage and reheating methods
You can store uncooked breaded arancini in the refrigerator for up to 24 hours before frying, which actually helps the coating adhere better. Place them on a parchment-lined tray without touching and cover loosely with plastic wrap. Already fried arancini keep in an airtight container in the refrigerator for 3 days, though they lose some crispness.
Reheating requires an oven set to 375°F for 10 to 12 minutes to restore the crispy exterior without drying out the rice. You place them on a wire rack over a baking sheet so hot air circulates all around, achieving results much better than microwaving, which makes them soggy. Air fryers work equally well at 350°F for 6 to 8 minutes, turning once halfway through. Never microwave arancini if you care about texture, because understanding what are arancini balls means appreciating that critical contrast between crunchy outside and creamy inside that only proper reheating preserves.
Next steps for trying arancini
You now understand what are arancini balls, from their Sicilian origins to the ingredients and techniques that make them special. The next logical step is experiencing them firsthand, whether you decide to test your cooking skills at home or seek out authentic versions prepared by professionals who’ve mastered the craft.
Starting with the homemade approach gives you control over fillings and lets you experiment with different flavor combinations, though it requires time and attention to detail. You’ll gain appreciation for the technique and precision that goes into each golden sphere as you work through the shaping and frying process.
If you’d rather experience arancini made by chefs who prepare them daily using traditional methods, visit La Dolce Vita Cucina in Chicago’s Portage Park neighborhood. Our kitchen celebrates authentic Italian dishes that bring Sicily’s culinary heritage to your table, letting you taste the difference that comes from recipes perfected over generations.