
A great creamy seafood pasta sauce can turn a simple weeknight dinner into something that feels like a special occasion. It’s the kind of dish you’d order at a restaurant, rich, silky, packed with tender shrimp or delicate scallops, but it’s absolutely something you can pull off in your own kitchen with the right technique and a handful of quality ingredients.
At La Dolce Vita Cucina, our kitchen in Chicago’s Portage Park neighborhood works with homemade pasta and fresh seafood daily. We know what makes a cream sauce cling perfectly to every strand of linguini, and we know the mistakes that turn it greasy or grainy. That hands-on experience is exactly what shaped the approach in this guide.
Below, we’ll walk you through building a creamy white sauce from scratch, covering everything from choosing your seafood to balancing garlic, parmesan, and white wine so each element pulls its weight. Whether you’re cooking for a date night or feeding the whole family, you’ll have a reliable method you can repeat any time the craving hits.
What makes a great creamy seafood pasta sauce
A great creamy seafood pasta sauce comes down to three things working in sync: fat, acid, and heat control. When you get these right, the sauce coats every piece of pasta without feeling heavy or greasy. When one element is off, the whole dish falls flat. Understanding why each component matters will help you make smarter decisions at every step of the process, from the moment you turn on the heat to the final toss in the pan.
The balance between fat, acid, and salt
The fat in your sauce comes from two main places: butter and heavy cream. Butter builds richness in the base, and cream carries that richness through the whole sauce. But fat alone makes a sauce taste flat and one-dimensional. You need acid to cut through it, and that is where dry white wine and a squeeze of fresh lemon juice do the heavy lifting. The wine goes in early to reduce and concentrate, while the lemon goes in at the very end to lift the whole dish.
Without acid, a cream sauce tastes like you are eating straight butter. Even a tablespoon of lemon juice at the finish completely changes the balance.
Salt is the third piece of the puzzle. Fresh seafood already carries natural salinity, so you need to taste as you build the sauce rather than season on autopilot. Parmesan adds another layer of salt and umami on top of that, which means you should always stir in the cheese before you reach for the salt shaker. Seasoning in stages gives you far more control than dumping everything in at once.
Here is a quick breakdown of what each core ingredient contributes:
| Ingredient | Role in the sauce |
|---|---|
| Butter | Richness and body in the aromatic base |
| Heavy cream | Silky texture and fat to carry flavor |
| White wine | Acid, depth, and lift |
| Parmesan | Salt, umami, and natural emulsification |
| Lemon juice | Brightness and balance at the finish |
| Garlic | Aromatic base that ties everything together |
Why heat control matters more than you think
High heat is the most common reason cream sauces break. When you push a cream-based sauce too hard, the fat separates from the liquid and you end up with a greasy, split mess instead of a smooth coating. Keeping your pan at medium or medium-low heat after you add the cream is what separates a silky, restaurant-quality result from a broken one. If you see rapid bubbling, pull the heat back immediately.
The same rule applies to your seafood. Shrimp, scallops, and clams all cook fast, and overcooking them turns them rubbery before the sauce even comes together properly. Pull your seafood off direct heat a little before it looks fully done, because it will carry over and finish cooking once you fold it into the warm sauce.
Patience at low heat gives you a sauce that reduces evenly and clings to the pasta the way it should. Rushing it will always cost you texture, no matter how good your ingredients are.
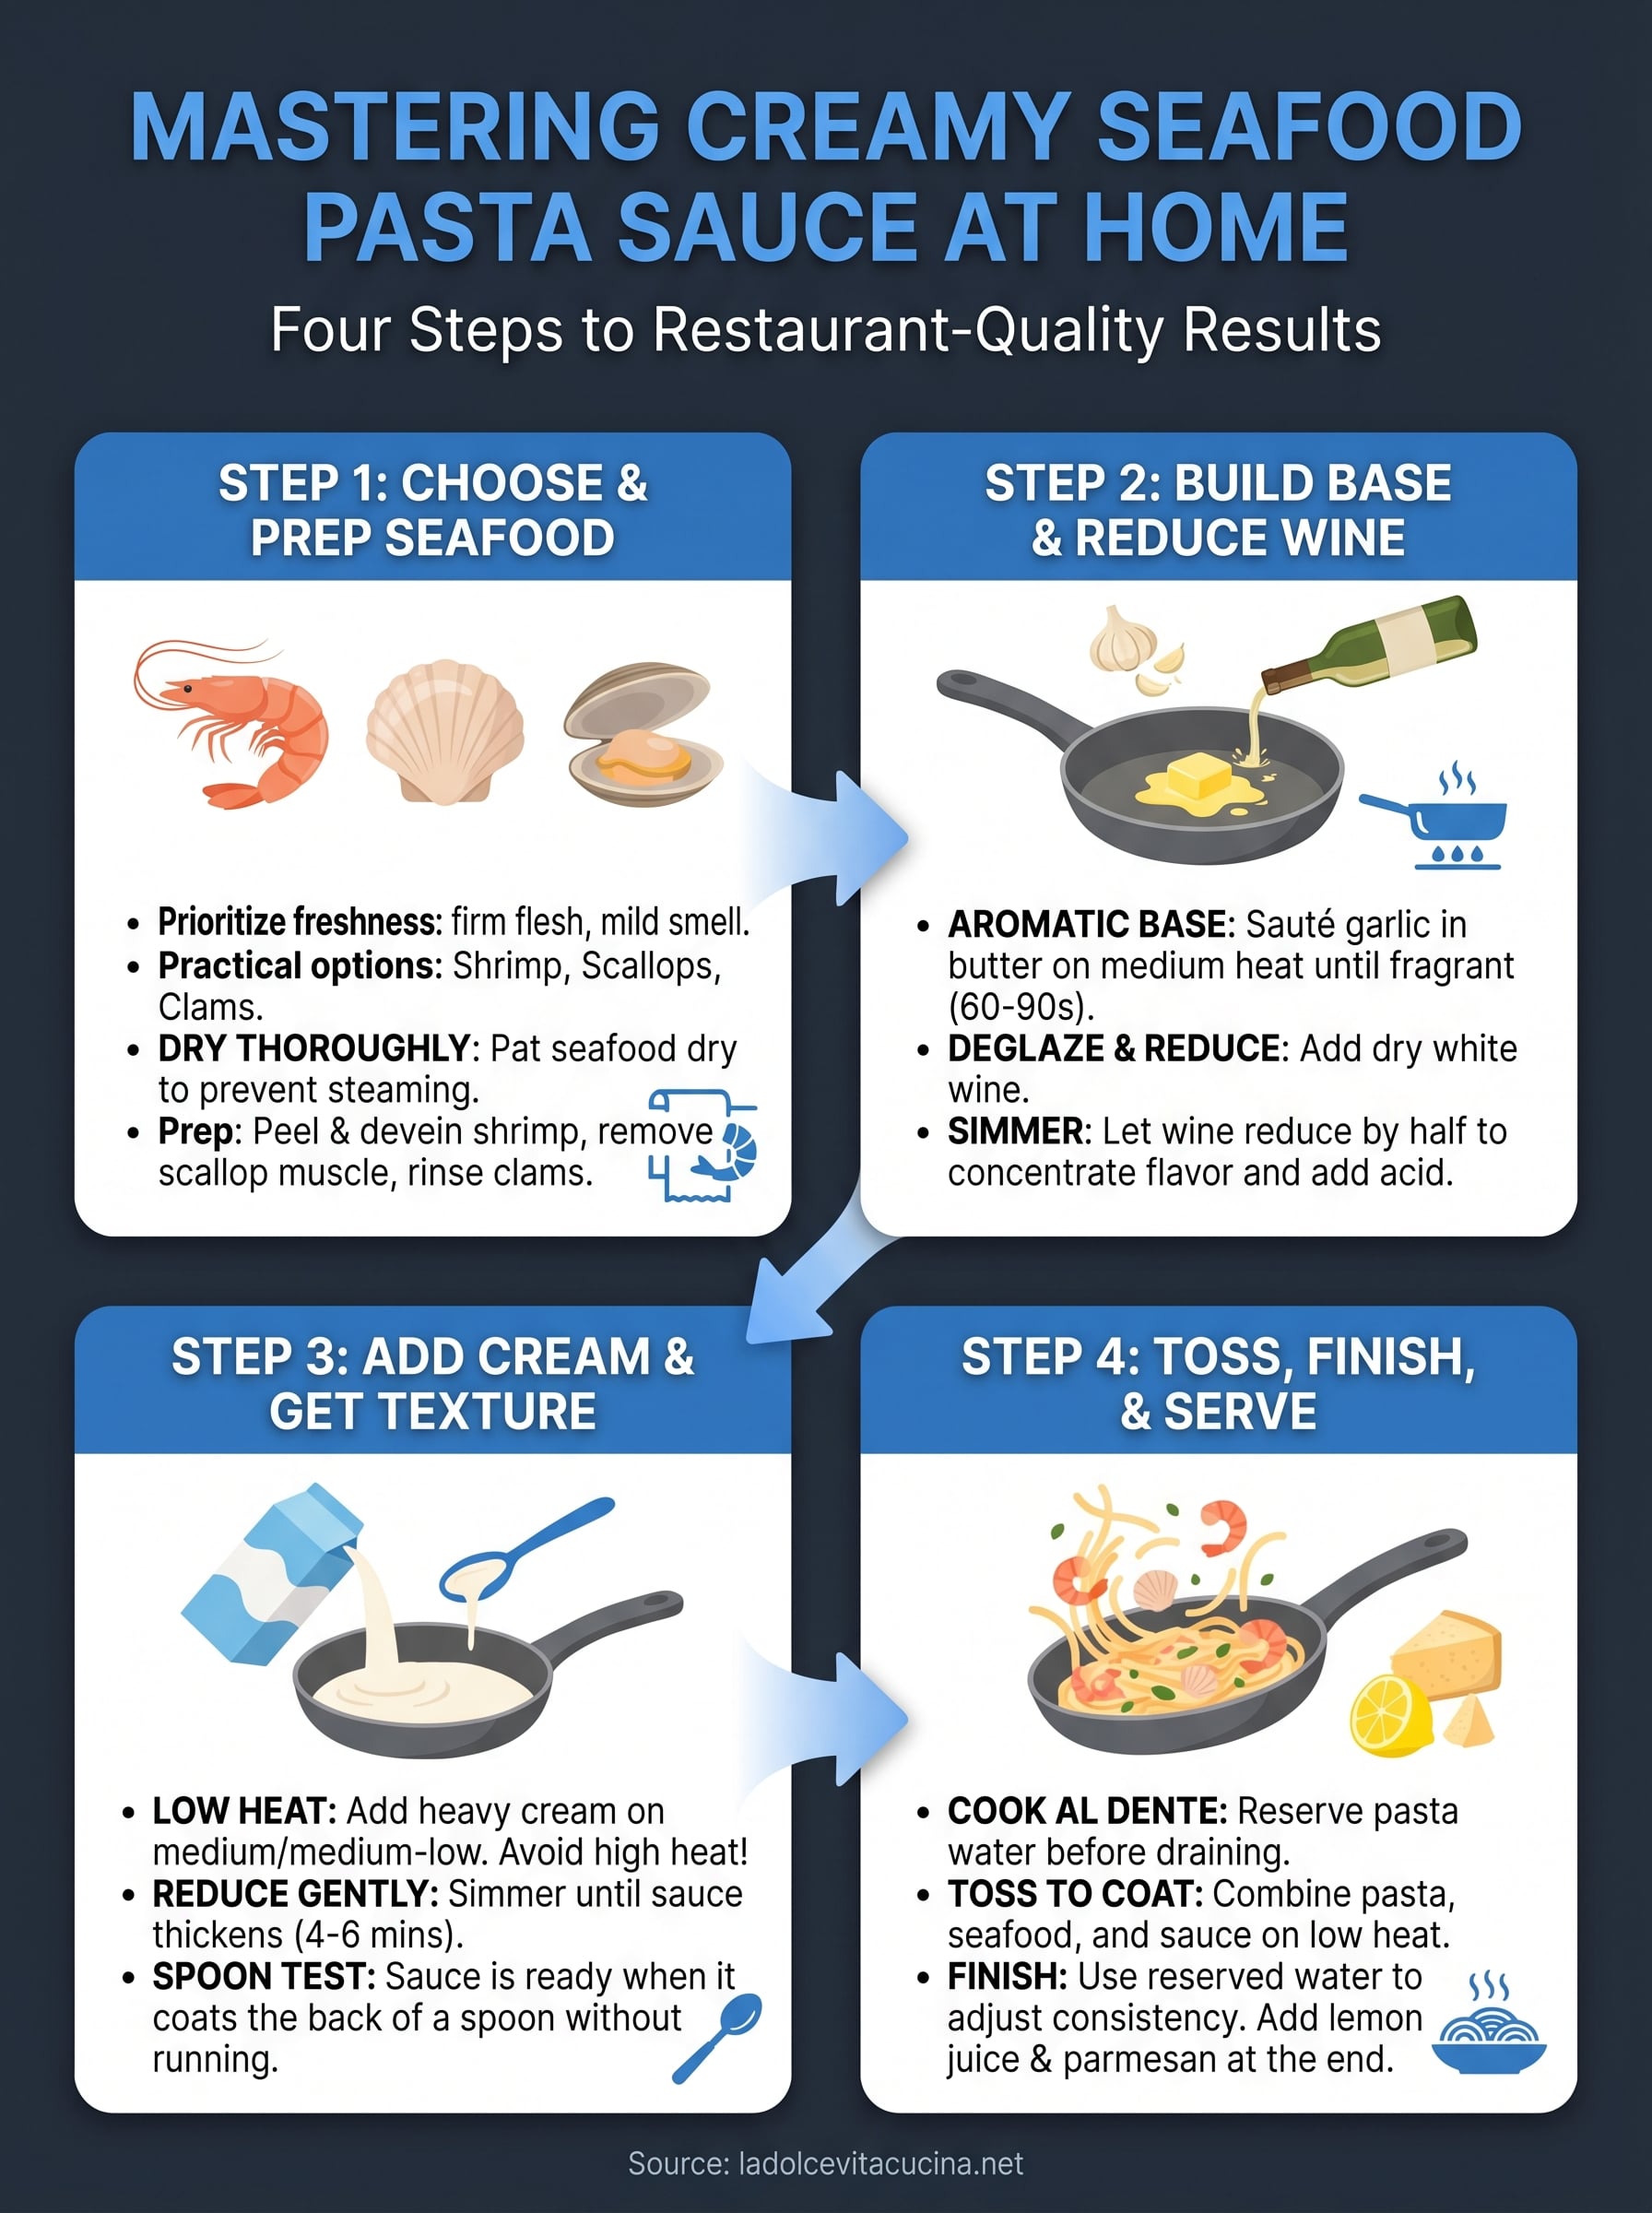
Step 1. Choose ingredients and prep seafood
Before you touch the pan, what you put in your cart matters as much as what you do at the stove. Freshness is the single biggest factor in how your creamy seafood pasta sauce turns out. Seafood that smells off or feels mushy will not improve with cream or garlic, so start by sourcing the best you can find at your local fishmonger or grocery counter.
Picking the right seafood
Shrimp, scallops, and clams are the three most practical options for this sauce. Shrimp cook quickly and stay tender, scallops add a natural sweetness that pairs beautifully with cream, and clams bring a briny depth that lifts the whole dish. You can use one type or combine two, but avoid mixing more than that or the cooking times become difficult to manage.
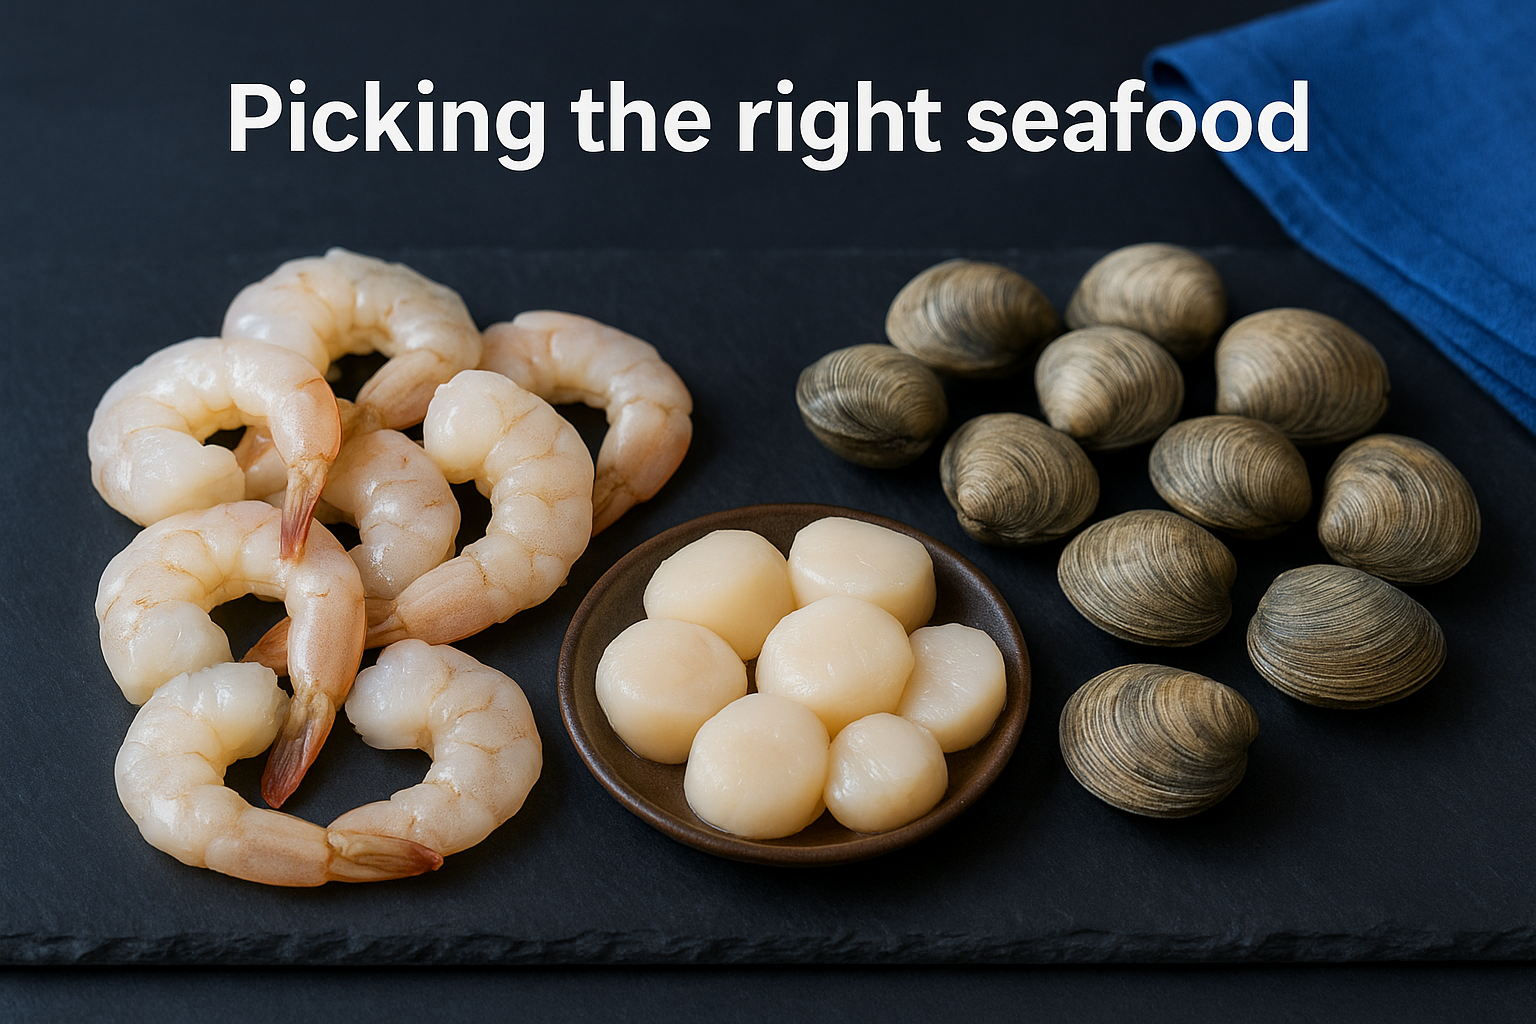
Fresh or properly thawed frozen seafood both work well here – the key is making sure nothing is still partially frozen when it hits the pan, because that drops the pan temperature and causes steaming instead of searing.
Here is what to look for when selecting each option:
| Seafood | What to look for |
|---|---|
| Shrimp | Firm flesh, mild ocean smell, no pink discoloration on raw meat |
| Scallops | Dry-packed if possible, cream or ivory color, no excess liquid pooling |
| Clams | Shells tightly closed, heavy for their size, fresh sea smell |
How to prep seafood before cooking
Dry your seafood thoroughly with paper towels right before it goes into the pan. Moisture on the surface of shrimp or scallops creates steam, which prevents proper browning and dilutes the sauce. Pat each piece dry and let it rest on a clean plate for a minute before cooking.
For shrimp, peel and devein them completely so nothing interrupts the texture of the finished dish. For scallops, pull off the small tough side muscle if it is still attached. Clams just need a good rinse under cold water to remove any grit from the shells.
Step 2. Build the base and reduce the wine
The base is where all the flavor in your creamy seafood pasta sauce gets built, so do not rush through it. Everything that happens in the next few minutes determines how complex the finished dish tastes. A properly constructed aromatic base gives the cream something meaningful to work with later, rather than just coating pasta with fat and no depth.
Start with garlic and butter
Heat a wide skillet over medium heat and add two tablespoons of unsalted butter. Once the butter melts and starts to foam, add your minced garlic, typically three to four cloves for a four-serving batch. Stir constantly and keep the heat at medium, because garlic goes from golden to burnt in seconds and burnt garlic will turn the entire sauce bitter with no way to fix it.
Cook the garlic for about sixty to ninety seconds, just until it turns pale gold and smells fragrant. You are not trying to brown it deeply here. The goal is to soften the sharp raw edge and push the flavor into the butter so every drop of the sauce carries that aroma.
Deglaze with white wine and reduce
Once the garlic is ready, pour in half a cup of dry white wine and raise the heat slightly to medium-high. The wine will bubble up immediately and start pulling any flavor from the bottom of the pan. Use a wooden spoon to scrape up any bits that have stuck.
A dry white like Pinot Grigio or Sauvignon Blanc works best here – avoid anything labeled "cooking wine" because the added salt makes it harder to control seasoning later.
Let the wine reduce by about half, which takes roughly three to four minutes. You will know it is ready when the sharp alcohol smell softens and the liquid looks slightly thicker and more concentrated. This reduction step is what builds the acidic backbone that keeps the final sauce tasting bright rather than heavy.
Step 3. Add cream and get the texture right
With the wine reduced, turn your heat back down to medium before you add anything else. This step matters more than most recipes acknowledge. Pouring cold heavy cream into a screaming hot pan shocks the fat and starts the sauce down the path toward breaking before it even has a chance to come together.
Pour in the cream at the right temperature
Add three-quarters of a cup of heavy cream directly into the reduced wine and garlic base, then stir immediately to combine everything. The liquid will look thin and loose at first, which is exactly what you want at this stage. Your job now is to let the cream reduce gently over medium to medium-low heat until it thickens enough to coat the back of a spoon, which typically takes four to six minutes.
Do not walk away from the pan during this step – cream reduces faster than you expect, and an extra two minutes at the wrong heat will leave you with a sauce that is too thick to toss with pasta properly.
Stir the sauce every thirty seconds or so to keep the bottom from scorching. You will see the edges start to thicken before the center does, which is a sign the reduction is working correctly. Keep stirring and the whole sauce will catch up.
How to tell when the texture is right
The spoon test is your most reliable tool here. Dip a wooden spoon into the sauce, then drag your finger across the back of it. If the line holds clean and does not flood back immediately, your sauce has reached the right consistency. If it runs back together quickly, give it another minute or two and test again.
Here is a simple reference for reading the sauce at different stages:
| Appearance | What it means | What to do |
|---|---|---|
| Watery, runs off spoon fast | Under-reduced | Keep simmering on medium-low |
| Coats spoon, line holds clean | Perfect texture | Remove from heat and proceed |
| Thick, pulls away from pan edges | Over-reduced | Add a splash of pasta water to loosen |
Once the texture is right, you are ready to bring the creamy seafood pasta sauce together in the final step.
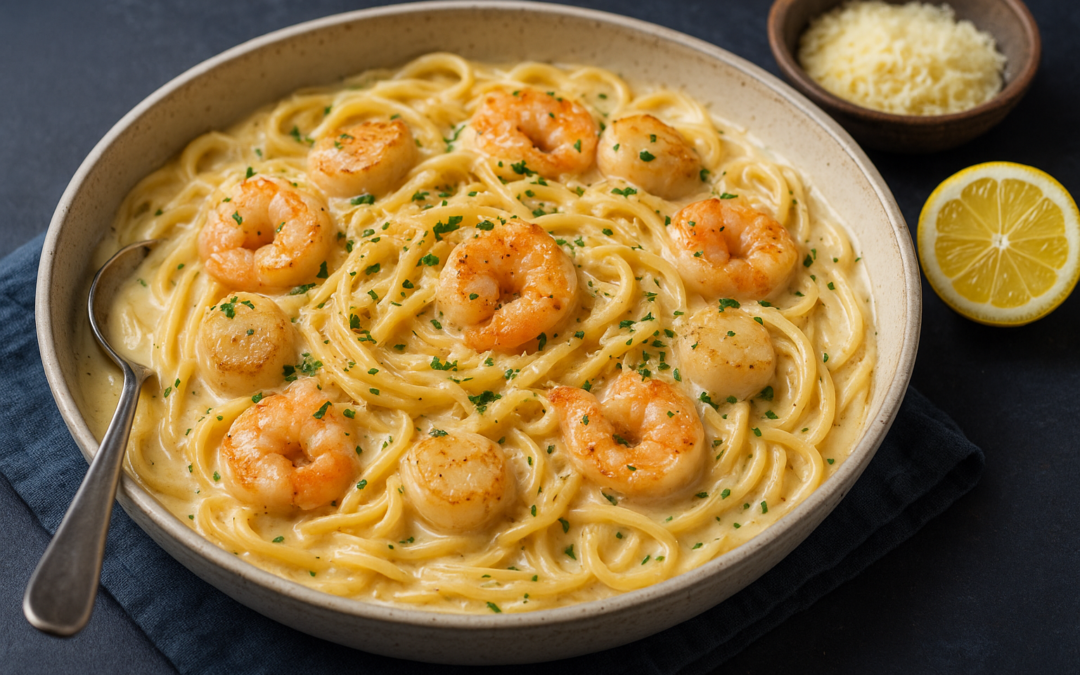
Step 4. Toss with pasta, finish, and serve
This is the step where everything comes together, and timing is everything. You want your pasta hitting the pan at the exact moment your sauce reaches the right consistency, which means starting the pasta water before you begin building the base in Step 2. That coordination keeps the dish from sitting and overcooking while you wait for the other components to catch up.
Cook your pasta and reserve the water
Linguini or tagliatelle work best with a creamy seafood sauce because their flat, wide surface area grabs the sauce and holds it through every bite. Cook your pasta in heavily salted boiling water until it is just under al dente, roughly one minute less than the package directions call for. It will finish cooking directly in the sauce, which means pulling it early gives you the right texture in the final dish rather than mushy noodles.
Before you drain the pasta, scoop out at least half a cup of the starchy cooking water and set it aside in a cup. This starchy liquid is your best tool for loosening the sauce at the end without thinning the flavor you have spent the last three steps building.
Combine seafood, sauce, and pasta
Add your cooked and drained pasta directly into the pan with the sauce over medium-low heat, then add your seared seafood back in at the same time. Use tongs to toss everything together for sixty to ninety seconds, letting the pasta absorb some of the sauce as it finishes cooking. If the sauce looks too thick, add the reserved pasta water a tablespoon at a time until it coats everything evenly without pooling at the bottom of the pan.
The starchy pasta water is what makes a creamy seafood pasta sauce cling to the noodles rather than slide off onto the plate.
Finish with a squeeze of fresh lemon juice, a generous handful of grated parmesan, and a few turns of black pepper. Serve immediately in warmed bowls so the sauce stays loose and glossy rather than tightening up against a cold surface.
A quick wrap-up
A great creamy seafood pasta sauce is not about complicated techniques or rare ingredients. It is about understanding why each step matters and executing with patience. You now have a clear method for choosing fresh seafood, building an aromatic base, reducing cream to the right consistency, and finishing with lemon and parmesan so every component earns its place on the plate.
The difference between a sauce that feels restaurant-quality and one that falls flat almost always comes down to heat control and seasoning in stages. Keep your heat at medium or lower once the cream goes in, taste as you build, and use reserved pasta water to dial in the final texture. Stick to those principles and the dish will come together reliably every time you make it.
If you want to see how Italian pasta dishes look when built with real care and quality ingredients, come visit us at La Dolce Vita Cucina in Chicago’s Portage Park neighborhood.