
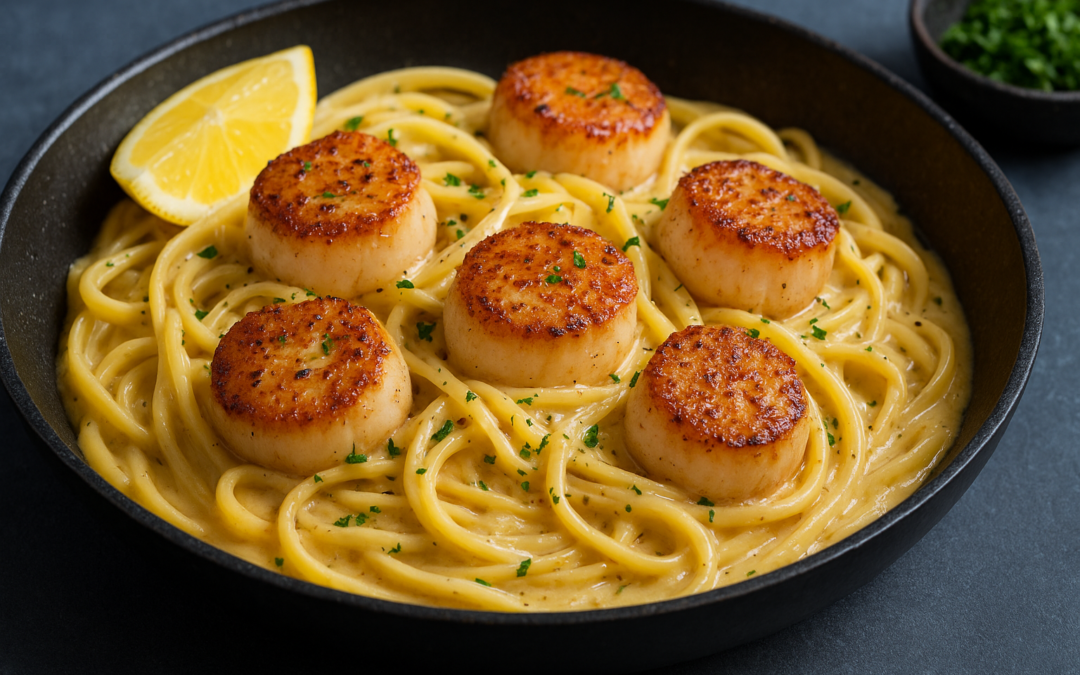
A perfectly seared scallop sitting on top of a bed of pasta is one of those dishes that looks like it belongs in a restaurant, and for good reason. At La Dolce Vita Cucina, our kitchen in Chicago’s Portage Park neighborhood pairs premium seafood with homemade pasta daily, so we know firsthand what makes this combination sing. The good news? Learning how to cook scallops for pasta at home is more straightforward than most people think.
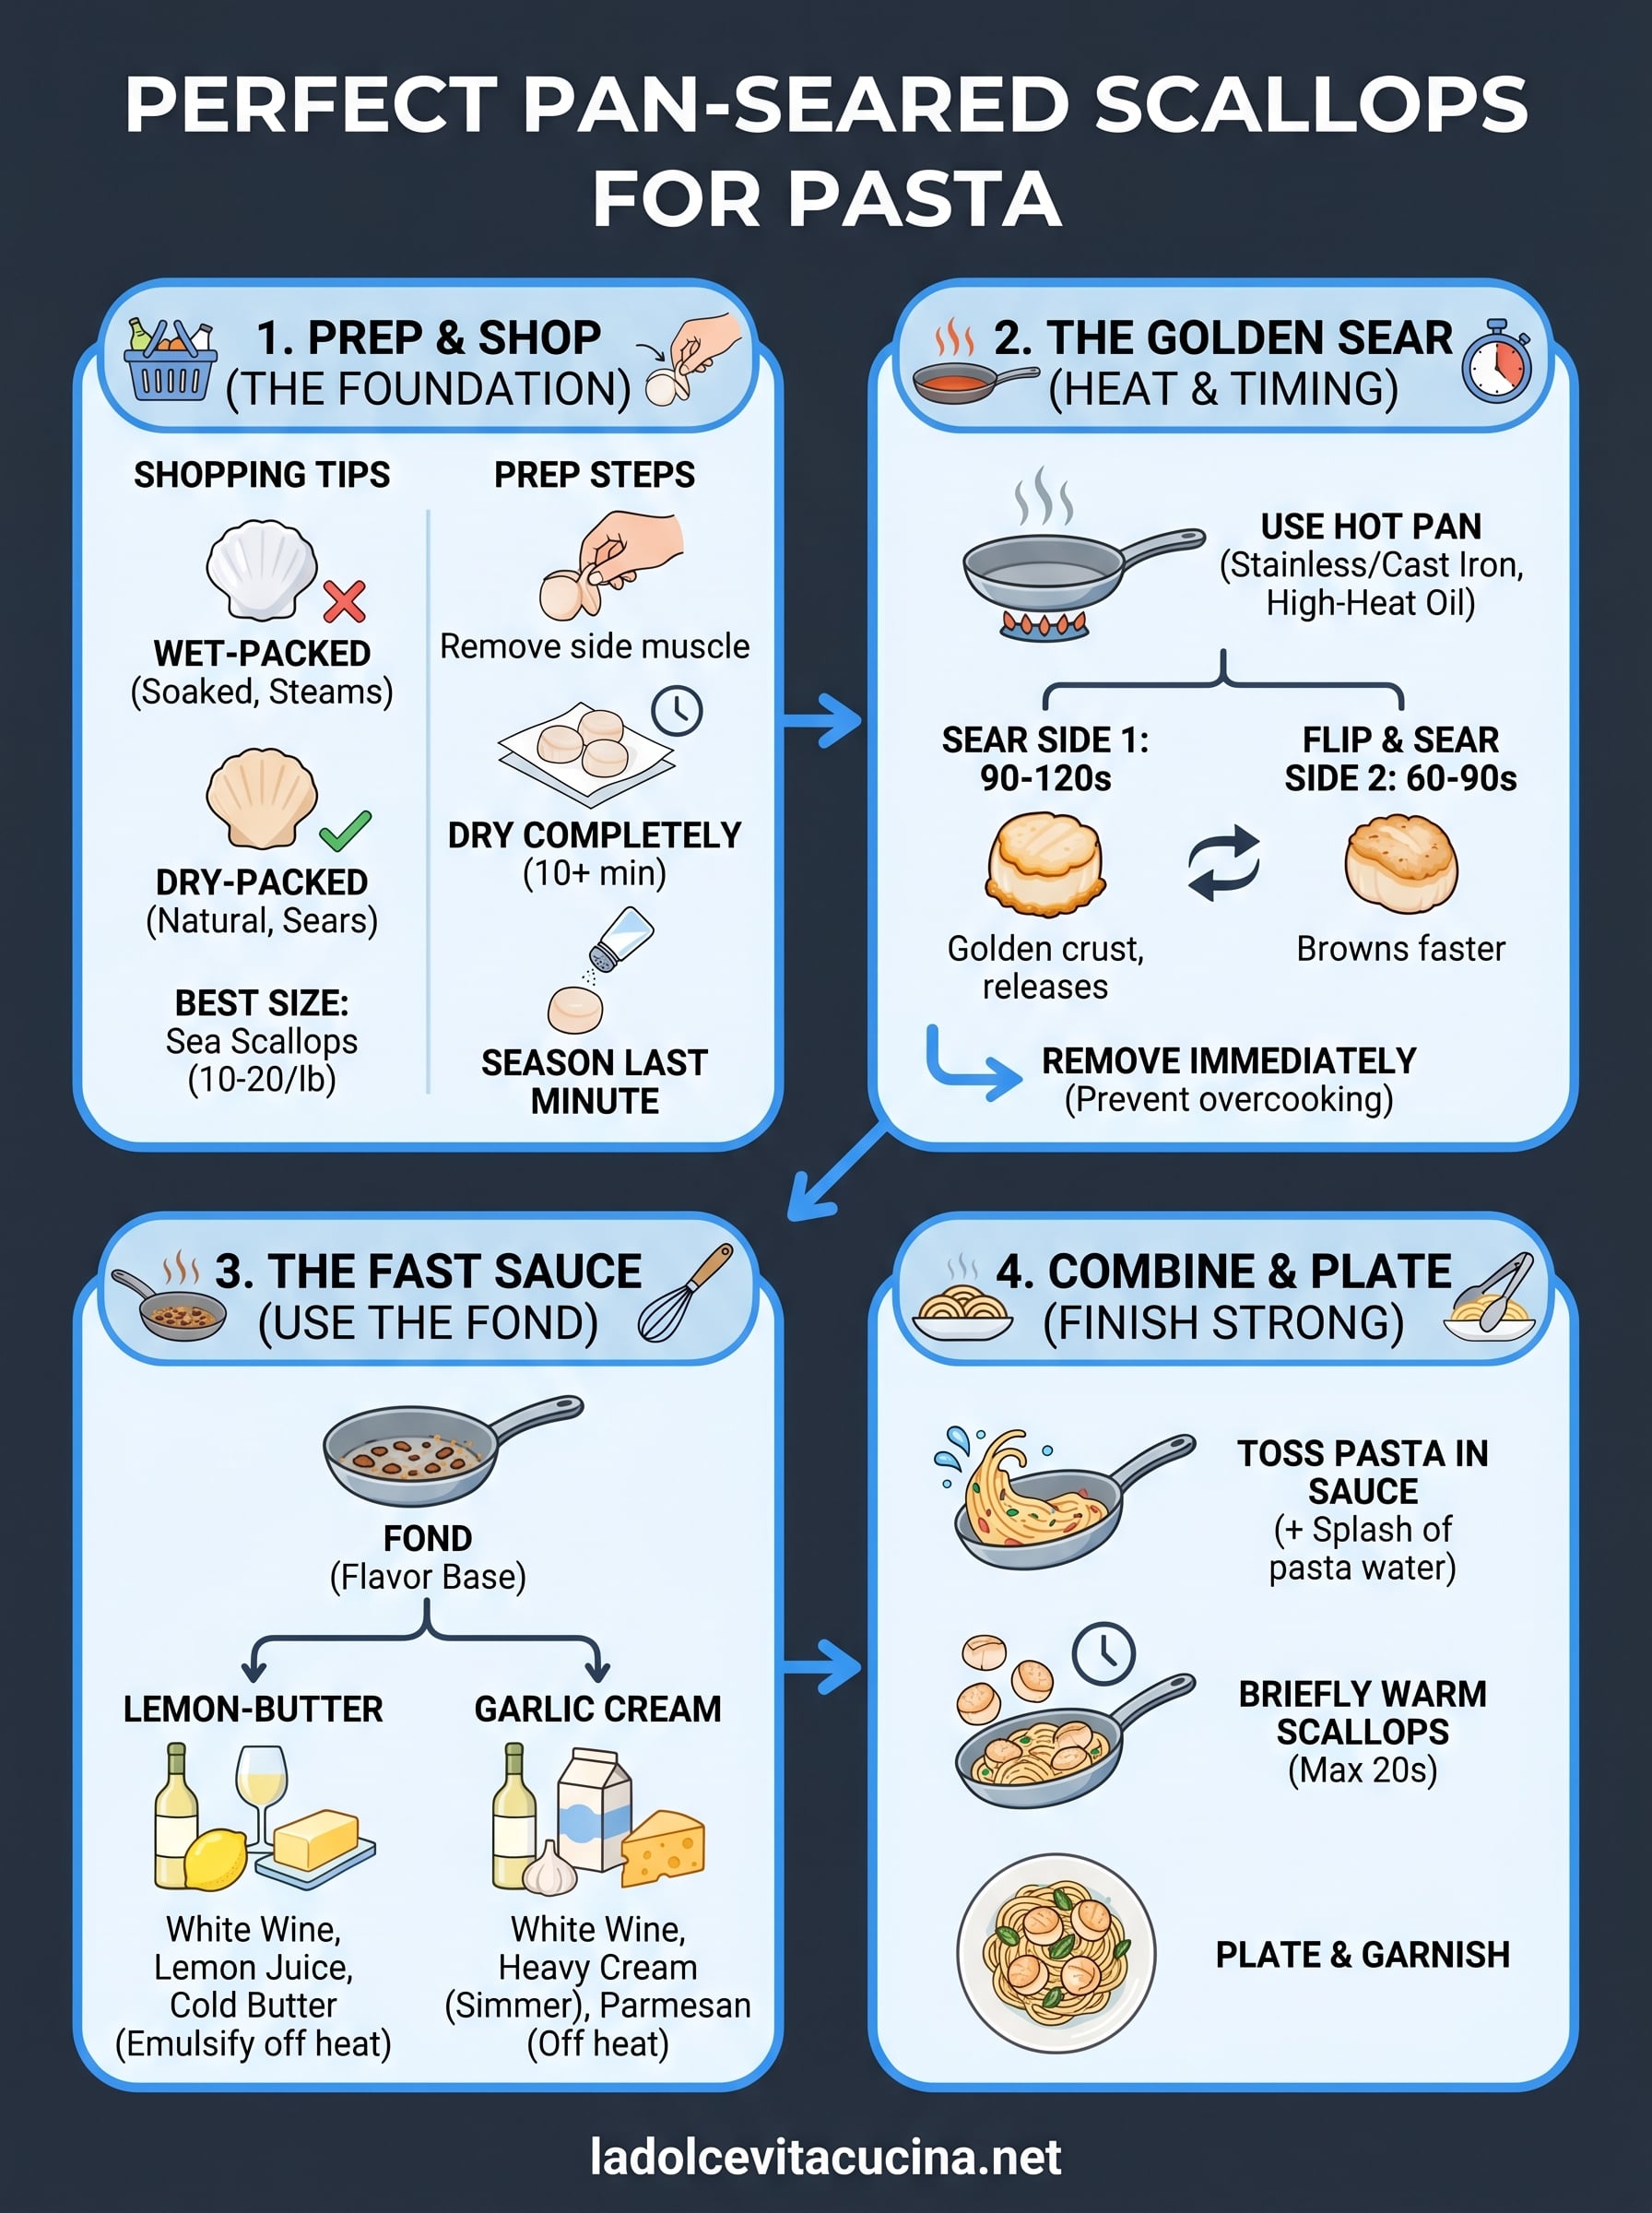
The secret comes down to a few non-negotiable steps: dry scallops, a screaming-hot pan, and the discipline to leave them alone while they sear. Get those right, and you’ll build that golden-brown crust that gives each bite its signature sweetness and texture. Get them wrong, and you end up with rubbery, pale discs that no amount of sauce can save.
This guide walks you through everything from selecting the right scallops at the store to plating them over your favorite pasta with a sauce that ties it all together. We’ll cover prep techniques, timing, heat control, and flavor pairings like garlic, lemon, and cream, the same building blocks we rely on in our own kitchen.
Scallops for pasta basics and shopping tips
Before you learn how to cook scallops for pasta, you need to understand what you’re actually buying. The seafood counter can be confusing, and making the wrong choice at the store will undermine every technique you apply at the stove. This section gives you the knowledge to walk in and pick the right scallops every time.
Wet-packed vs. dry-packed: the most important distinction
Not all scallops at the fish counter are equal. Wet-packed scallops have been soaked in a sodium tripolyphosphate solution, which causes them to absorb water and look plump and bright white. That extra moisture is the enemy of a good sear: when the scallops hit the pan, they release all that liquid and steam instead of browning. You end up with a pale, rubbery result no matter how hot your pan gets.
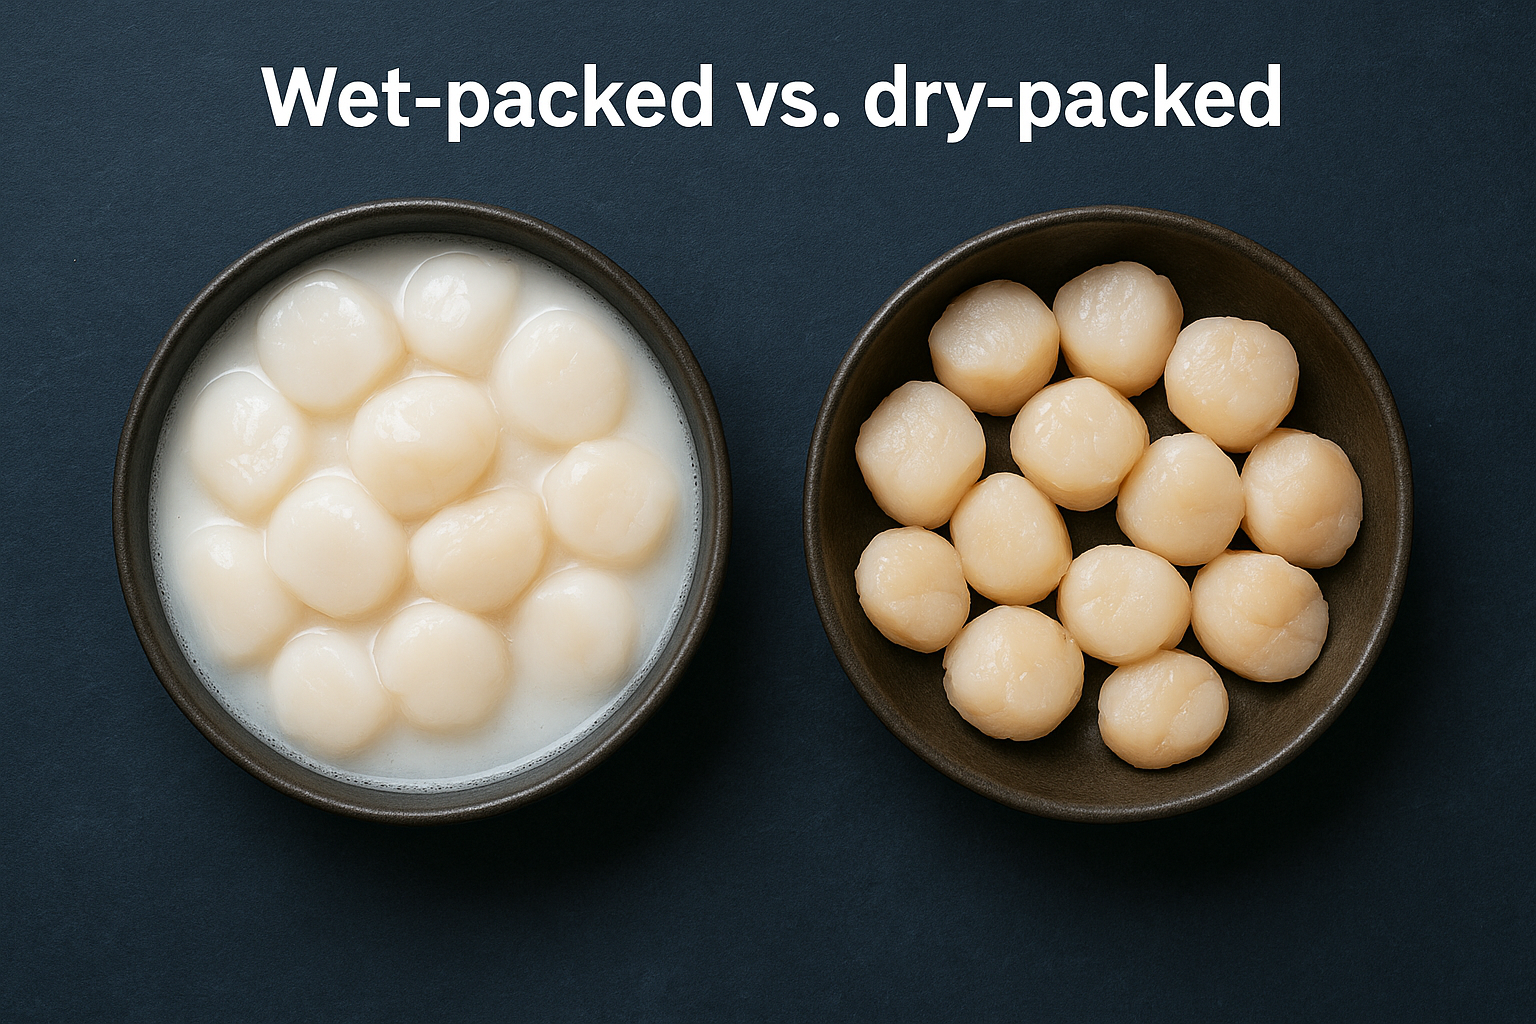
Dry-packed scallops contain no additives. They look slightly off-white or even faintly beige, and they feel tacky to the touch rather than slippery. That tackiness is a good sign: it means the natural proteins are intact, and the scallops will grip the pan surface and develop a proper crust.
If the scallops look bright white and are sitting in a milky liquid, put them back and look for dry-packed ones elsewhere.
When you ask at the counter, use the phrase "dry-packed" directly. Some fishmongers label them as "chemical-free" or "natural." If the label does not specify, ask before you buy.
What size scallops work best for pasta
Sea scallops are the right choice for a pasta dish. They run roughly 10 to 20 per pound, are large enough to develop a meaningful crust on each side, and hold their own against a sauce without disappearing into the dish. Bay scallops are much smaller and cook in seconds, which makes them difficult to control and easy to overcook. They work well in soups and light sautés, but they are not the right choice here.
For a pasta serving two people, six to eight large sea scallops is the right quantity. That gives you three or four scallops per plate, which balances the pasta without overloading it.
| Scallop Type | Approximate Count per Pound | Best Use |
|---|---|---|
| Sea scallops | 10 to 20 | Pan-searing for pasta |
| Bay scallops | 50 to 100 | Soups, quick sautés |
| Calico scallops | 35 to 60 | Chowders, not searing |
Fresh vs. frozen: what actually works
Fresh scallops from a reputable fishmonger are ideal, but high-quality frozen scallops can deliver nearly identical results if you handle them correctly. Buy individually quick frozen (IQF) dry-packed sea scallops from a trusted source. Avoid bags where the scallops are frozen together in a solid block of ice, which usually signals a wet-packed product.
Thaw frozen scallops overnight in the refrigerator in a single layer on a plate lined with paper towels. Slow refrigerator thawing preserves the texture and surface integrity that you need for a proper sear. Do not thaw them under running water or at room temperature.
Once thawed, treat them exactly the same as fresh: pat dry, season, and sear without delay.
Step 1. Prep scallops so they sear, not steam
Preparation is where most home cooks lose the battle before they ever turn on the stove. Moisture and a cold surface are the two things that prevent a scallop from searing properly, and both problems are fixable in five minutes of focused prep before you cook. Follow this sequence every time, and the crust takes care of itself.
Remove the side muscle
Each sea scallop has a small, rectangular tag of muscle attached to its side, often called the "foot." This piece stays chewy even after cooking, and it creates an uneven surface that prevents full flat contact with the pan. Run your fingers along the edge of each scallop, and if you feel a firm, slightly opaque tab, pinch it between your thumb and forefinger and pull it away. It releases cleanly without tearing the rest of the scallop.
Check each scallop as you go through this quick prep list:
- Pull off any side muscle still attached to the flat edge
- Remove any shell fragments by hand rather than rinsing
- Confirm the scallop lays flat and even on both sides
Dry them completely
This step matters more than any seasoning decision you will make. Lay each scallop on a double layer of paper towels, press another layer on top, and let them sit for at least ten minutes to wick away surface moisture. Rushing this step means the water on the surface turns to steam the moment it hits the hot pan, and you will not build a crust.
A scallop that feels tacky and dry to the touch is ready to sear. One that feels wet or slippery needs more time on the paper towels.
After drying, do not rinse the scallops under running water. That reintroduces exactly the moisture you just removed. If you spot any remaining shell fragments, pick them off by hand.
Season at the last minute
Season both flat sides of each scallop with a generous pinch of kosher salt and a small amount of black pepper right before they go into the pan. Salting too early draws moisture to the surface through osmosis, which undoes all the drying work you just completed.
Aim for a window of 30 to 60 seconds between seasoning and searing. This principle holds whether you are building a lemon-butter sauce or a cream base, and it is one of the most consistent details behind learning how to cook scallops for pasta that actually looks and tastes like restaurant food.
Step 2. Pan-sear scallops with a golden crust
The pan you choose and how hot it gets before the scallops touch the surface determines everything about the quality of the crust. If you did the prep work in Step 1 correctly, this step is mostly about restraint and timing: put the scallops in, leave them alone, and flip once.
Choose the right pan and preheat it properly
A stainless steel or cast iron skillet is the best tool for searing scallops. Both materials hold high heat evenly and allow the fond (the browned bits left in the pan) to build, which becomes the base for your sauce in Step 3. Avoid non-stick pans here: they cannot reach the temperatures needed for a proper crust without degrading the coating.
Heat your pan over medium-high heat for two full minutes before adding any fat. Then add one tablespoon of a neutral, high-smoke-point oil such as avocado oil or refined grapeseed oil. Swirl it to coat the bottom and wait another 30 seconds until the oil begins to shimmer. You want the surface hot enough that a drop of water flicked into the pan evaporates almost instantly.
The pan must be hot before the scallops go in. A warm pan produces steam; a hot pan produces a crust.
Place scallops and time each side
Lay each scallop flat side down in the pan, working away from you to avoid oil splatter. Leave at least an inch of space between each one: crowding drops the pan temperature and causes steaming rather than searing. For a pan holding six scallops, work in two batches if necessary rather than forcing them all in at once.
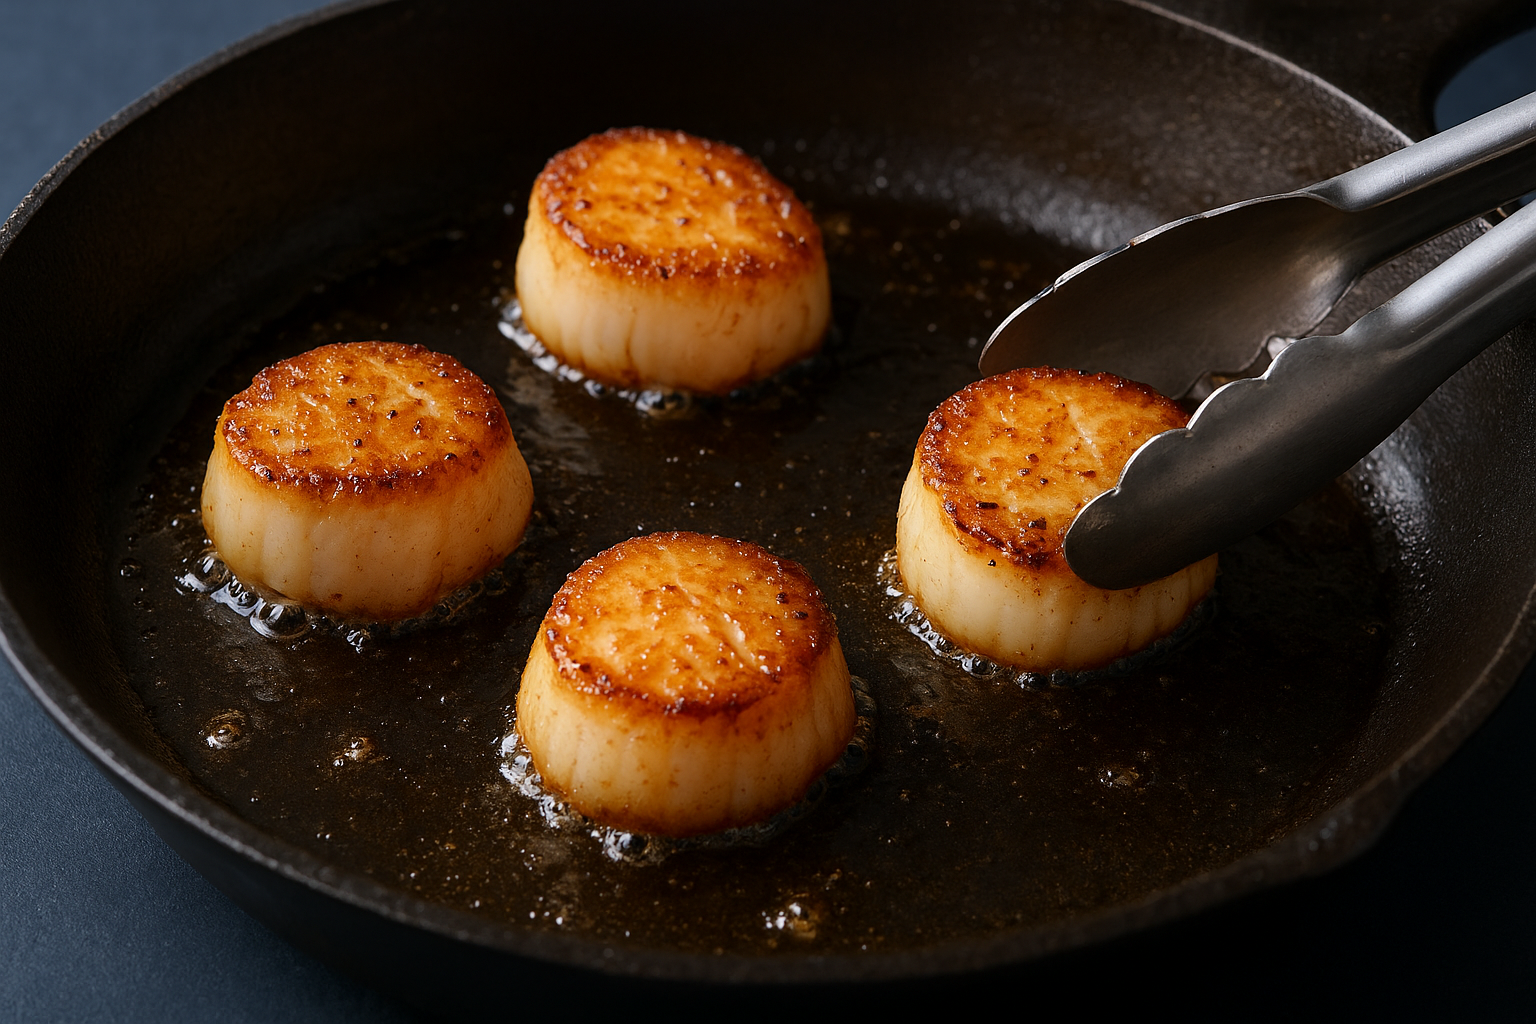
Do not touch them after they go in. Let the scallops sear undisturbed for 90 seconds to two minutes. You will know they are ready to flip when the edges turn opaque about halfway up the side and the bottom releases from the pan without sticking.
Flip each scallop with tongs and sear the second side for 60 to 90 seconds. The second side browns faster than the first. Pull them from the pan and set them on a warm plate the moment they are done. Scallops carry over heat quickly, and leaving them in the pan means they will overcook before you finish the sauce. That carryover overcooking is one of the most common reasons people struggle with how to cook scallops for pasta at home.
Step 3. Make a fast sauce that clings to pasta
The moment your scallops come off the heat, the pan is ready for its second job. All those browned bits stuck to the bottom, called fond, are concentrated flavor, and they dissolve into your sauce in seconds. This is one of the most practical parts of learning how to cook scallops for pasta: the searing step and the sauce step share the same pan, which means less cleanup and more depth in every bite.
Work with the fond in the pan
Lower the heat to medium immediately after removing the scallops. The pan is still very hot, and you want to build flavor without burning the fond. Add one tablespoon of unsalted butter and let it melt, then add two to three minced garlic cloves. Stir constantly and cook the garlic for 30 to 45 seconds, just until fragrant. Do not let it brown, or it will turn bitter and compete with the sweetness of the scallops.
The fond dissolves when you add liquid, so scrape the pan bottom firmly as soon as the wine or broth hits the hot surface.
Choose your sauce direction
Two sauces work particularly well with seared scallops over pasta: a lemon-butter pan sauce and a light cream sauce. Each comes together in under four minutes and clings to the pasta rather than pooling at the bottom of the bowl. Use this template to choose based on what you have on hand:
| Sauce | Key Liquid | Additional Flavor | Best Pasta Match |
|---|---|---|---|
| Lemon-butter | ¼ cup dry white wine + juice of 1 lemon | Fresh parsley, capers | Linguini, spaghetti |
| Garlic cream | ¼ cup dry white wine + ½ cup heavy cream | Parmesan, thyme | Tagliatelle, fettuccine |
For the lemon-butter version, pour the wine into the hot pan after the garlic, scrape the bottom firmly, and let it reduce by half. Then add the lemon juice and two more tablespoons of cold butter, swirling the pan off the heat to emulsify into a glossy, light sauce.
To make the cream version, add the wine first and reduce it by half, then pour in the heavy cream and let it simmer for two minutes until it coats the back of a spoon. Stir in a small handful of grated Parmesan off the heat to keep the sauce smooth and prevent it from breaking before you add the pasta.
Step 4. Toss pasta, finish scallops, and plate
This is the step where everything you have built comes together, and timing is the only thing standing between a great plate and a soggy one. Your sauce is ready, your scallops are resting, and your pasta should be finishing in the pot right now. Cook the pasta until it is just shy of al dente, about one minute less than the package suggests, because it will finish cooking in the sauce.
Combine pasta and sauce in the pan
Use tongs or a spider strainer to transfer the cooked pasta directly from the pot into the pan with the sauce. Do not drain it into a colander first. The small amount of pasta water clinging to the noodles helps the sauce loosen and coat every strand more evenly. If the sauce looks tight or begins to clump, add a splash of the starchy pasta cooking water, about two tablespoons at a time, and toss over medium heat for 30 to 45 seconds.
Reserve at least half a cup of pasta cooking water before you transfer the noodles, because you cannot go back for it once it is gone.
Toss the pasta firmly so every strand picks up the sauce rather than sitting in a pool at the bottom of the pan. Taste the pasta at this point and adjust with a pinch of salt or an extra squeeze of lemon if you are making the lemon-butter version. Once the pasta is glossy and well-coated, pull the pan off the heat.
Return scallops and plate immediately
Nestle the seared scallops back into the pan on top of the pasta for no more than 20 seconds, just long enough to warm them through without continuing to cook them. Longer than that, and you risk pushing them past the just-cooked stage you worked hard to achieve in Step 2. This brief return is the correct way to finish the dish when you are learning how to cook scallops for pasta without losing that tender center.
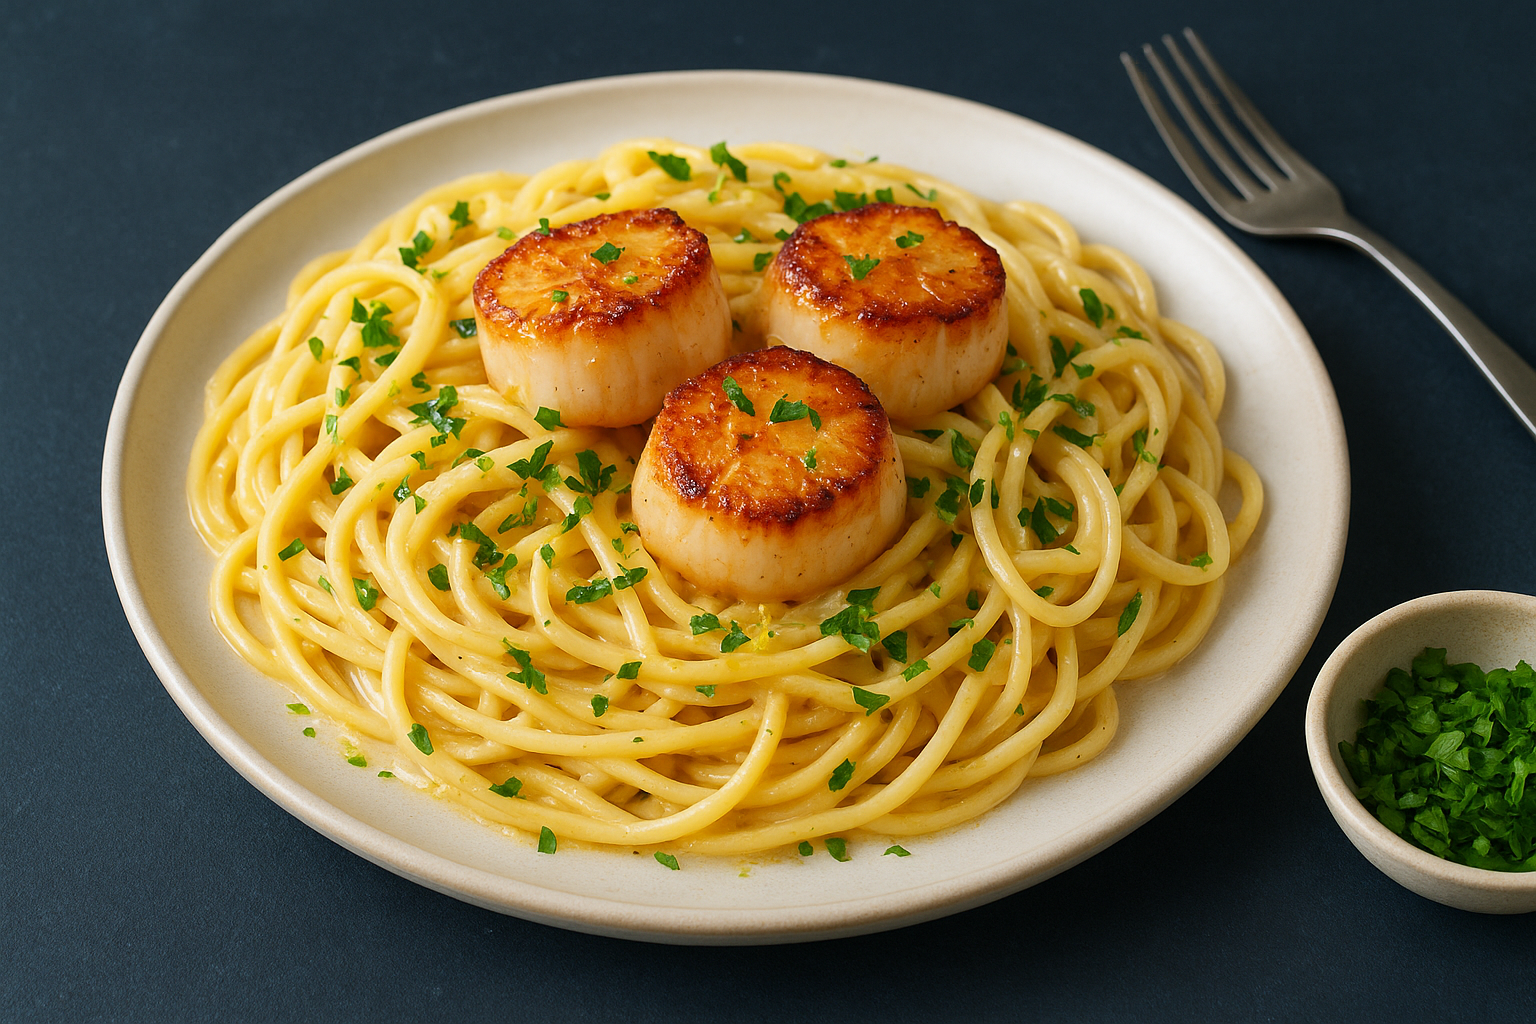
Plate by twirling the pasta into the center of each bowl with tongs, then setting two to four scallops on top. Spoon any remaining sauce from the pan directly over the scallops. Finish each plate with a small handful of fresh flat-leaf parsley and a light grate of lemon zest if you used the lemon-butter sauce, or a thin shaving of Parmesan for the cream version. Serve immediately while the scallops are still warm.
Troubleshoot rubbery scallops and broken sauce
Even when you follow every step, things can still go wrong, and the two most common failures are rubbery scallops and a sauce that separates or turns greasy. Understanding what caused each problem means you can fix it on the next attempt, and often correct it mid-cook before the dish hits the table.
Why your scallops turned rubbery
Overcooking is the single most common cause of rubbery scallops, and it almost always comes from one of four specific mistakes. Wet-packed scallops steam instead of sear, which forces you to keep them in the pan longer to achieve any color, and by that point the interior is already overcooked. Crowding the pan drops the surface temperature and produces the same steaming effect. Leaving the scallops in the pan while you build the sauce carries them past the ideal temperature. Finally, returning them for too long in Step 4 pushes them over the edge.
A properly cooked scallop should feel like a firm marshmallow when pressed gently, not like a pencil eraser.
Use this checklist to pinpoint the specific cause when you are learning how to cook scallops for pasta and the texture is not right:
- Bright white and rubbery throughout: wet-packed scallops used, swap to dry-packed next time
- Pale exterior, chewy center: pan was not hot enough before they went in
- Good crust but tough all the way through: cooked too long on each side, or left in the pan after the sear
- Rubbery after plating: returned to the sauce too long in Step 4, keep it to 20 seconds maximum
Why your sauce broke or turned greasy
A broken butter sauce looks oily and separated rather than glossy, and it happens when the emulsion between the fat and the liquid collapses. The most common trigger is adding cold butter to a pan that is too hot, or adding it all at once rather than in small increments. Lower the heat to medium-low before you swirl in the final butter, and add it one tablespoon at a time while moving the pan constantly off and on the burner.
Cream sauces break when the heat runs too high or the Parmesan goes in while the pan is still on the burner. Pull the pan completely off the heat before stirring in any cheese, and let the residual warmth melt it slowly. If the sauce looks grainy or oily, add one tablespoon of warm pasta water and whisk quickly over low heat to bring it back together.
One Last Check Before You Serve
Before the plates leave your counter, run through one quick mental checklist. Each scallop should have a deep golden crust on at least one flat side, and the center should feel slightly springy, not firm. The pasta should be glossy and coated, not sitting in a puddle of sauce at the bottom of the bowl. If anything looks dry, a small splash of pasta water and a quick toss in the pan fixes it in under 30 seconds.
Knowing how to cook scallops for pasta well comes down to respecting a few repeatable principles: dry scallops, a hot pan, and a sauce built from the same fond you created during the sear. These techniques stay consistent whether you are cooking for two on a Tuesday or hosting a dinner party. If you want to taste what this dish looks like when a professional kitchen executes it, visit us at La Dolce Vita Cucina in Chicago’s Portage Park neighborhood.