
Store-bought Italian dressing sits in a bottle for months, loaded with preservatives and artificial flavors that dull everything it touches. The best Italian vinaigrette takes about five minutes to make from scratch, and the difference on your palate is immediate. Once you taste a fresh version, there’s no going back to that shelf-stable stuff.
At La Dolce Vita Cucina, our kitchen in Chicago’s Portage Park neighborhood treats even the simplest components with intention. A vinaigrette isn’t an afterthought here, it’s a foundational element that can elevate a plate of greens into something genuinely worth savoring. That same philosophy applies whether you’re plating a salad at home or finishing a homemade antipasto spread for guests.
This guide breaks down exactly how we approach a classic Italian vinaigrette, the ratios, the ingredients that actually matter, and the small adjustments that separate a good dressing from a restaurant-quality one. You’ll walk away with a reliable recipe you can memorize and a clear understanding of why each ingredient earns its place in the bowl. No filler, no guesswork, just a better vinaigrette.
What makes an Italian vinaigrette restaurant style
When you order a salad at a good Italian restaurant, the dressing doesn’t taste like something poured from a bottle. It has brightness, depth, and a clean finish that lingers just long enough. That quality doesn’t come from a secret ingredient. It comes from a handful of deliberate decisions that most home cooks skip because no one taught them the framework behind the recipe.
The acid-to-oil ratio is your foundation
Most recipes online follow a generic 1:3 acid-to-oil ratio. Restaurant kitchens often push closer to 1:2 or 1:2.5 when they want a vinaigrette that stands up to hearty greens, grilled vegetables, or cold pasta. The reason is straightforward: a timid dressing disappears on the plate. You want the acid to be present without being aggressive, and that balance shifts depending on what the dressing is coating.
The type of acid matters just as much as the amount. Red wine vinegar is the most traditional choice for the best Italian vinaigrette because it carries a fruity sharpness that pairs well with olive oil without overpowering it. Some kitchens blend red wine vinegar with a small pour of fresh lemon juice to add brightness without introducing too much citrus character. Both acids behave differently on the palate, and understanding that difference helps you match the dressing to a specific dish.
The ratio you choose should always match what you’re dressing. A delicate butter lettuce needs a gentler acid-to-oil balance than a robust arugula and fennel salad.
Fresh aromatics are where flavor actually builds
Garlic is the most common aromatic in an Italian vinaigrette, but how you prepare it changes the outcome significantly. Minced garlic releases more sharp, pungent flavor. Grated garlic on a microplane breaks down further and disperses throughout the dressing more evenly. At restaurants, garlic often rests in the acid before the oil is added. This step mellows the raw bite while keeping the flavor intact.
Shallots work alongside or instead of garlic to bring a milder, slightly sweet allium note that rounds out the acidity. Fresh or dried oregano adds the herbal backbone most people associate with Italian dressing. Dried oregano rubbed between your fingers before it goes in releases more of its volatile oils. Fresh flat-leaf parsley, added at the end, contributes a clean green note that dried herbs cannot replicate.
Oil quality defines the final character
You cannot make a restaurant-quality vinaigrette with a neutral oil. Extra virgin olive oil is non-negotiable here. The flavor of the oil carries through the finished dressing in a way that canola or vegetable oil simply cannot. A grassy, peppery extra virgin olive oil from southern Italy will produce a bolder, more assertive dressing. A buttery, mild oil from Liguria will produce something softer and more delicate.
Beyond the type of oil, freshness matters significantly. Olive oil degrades with exposure to light, heat, and air. An oxidized oil tastes flat or slightly rancid, and that off-note transfers directly into your vinaigrette. Store your olive oil in a dark, cool location and use it within a few months of opening. At La Dolce Vita Cucina, we treat olive oil as a living ingredient, not a pantry staple to purchase once and forget about for a year.
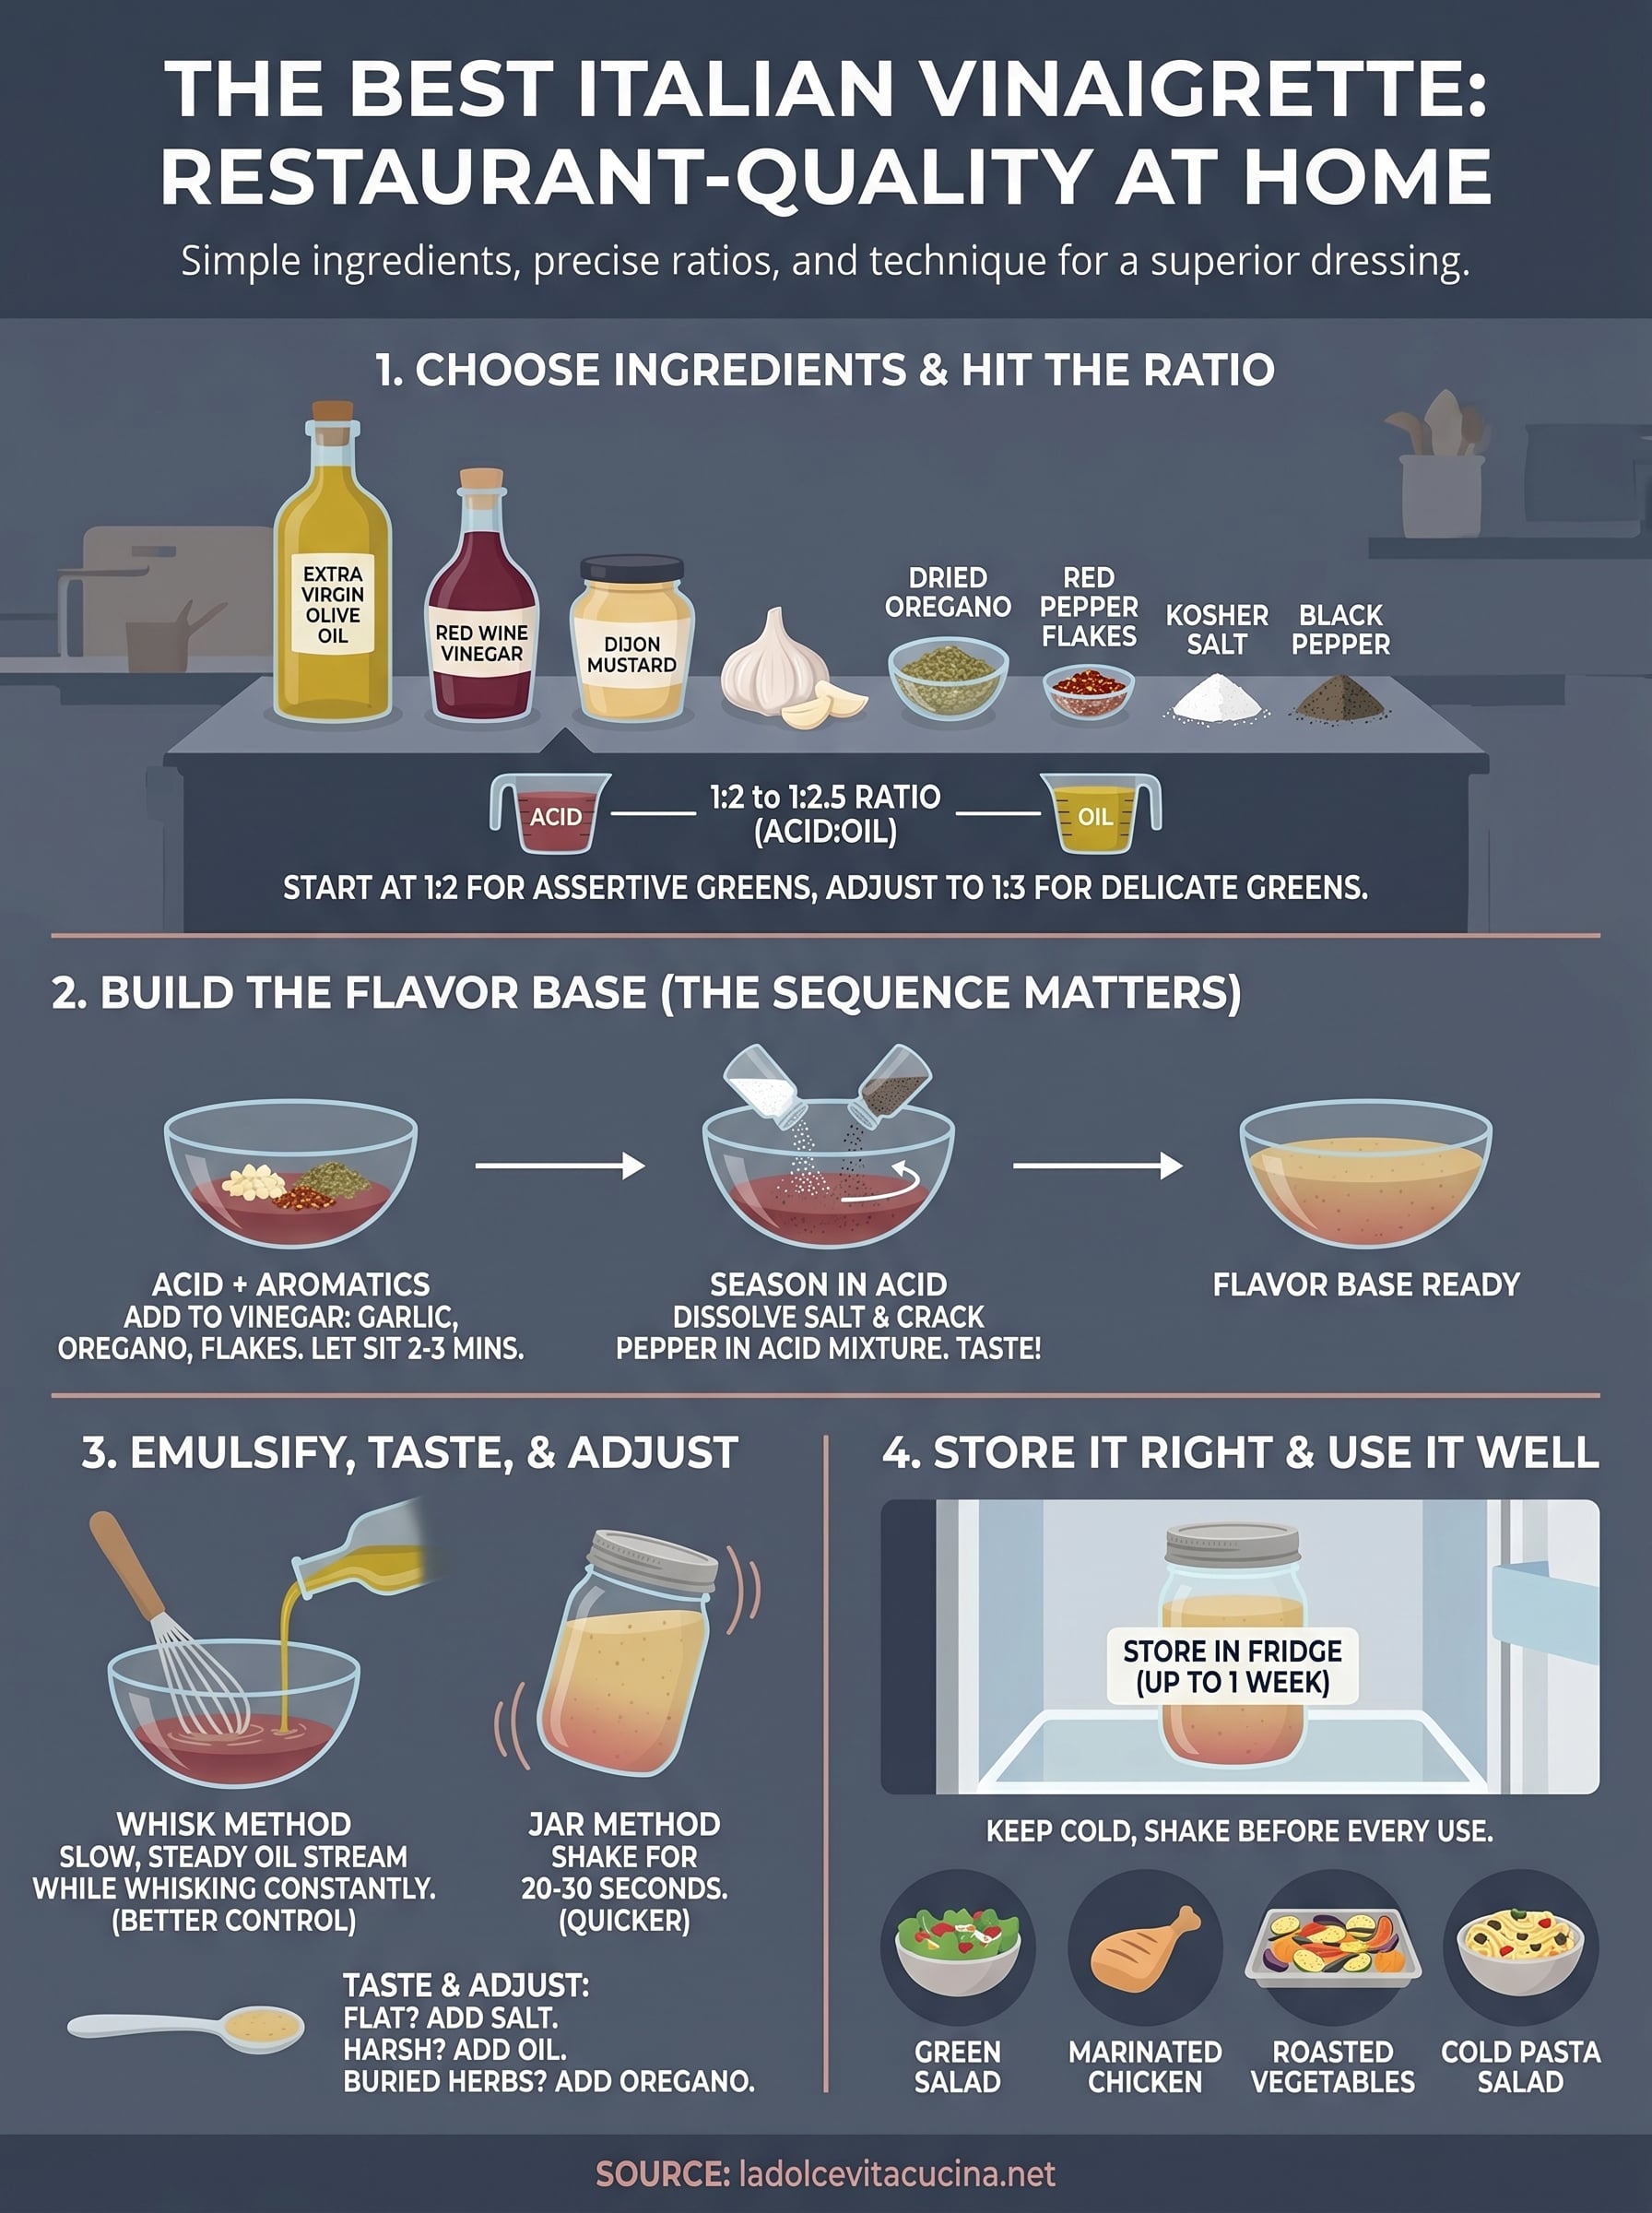
Step 1. Choose ingredients and hit the right ratio
Before you whisk anything together, you need to know what goes in the bowl and how much of each element to use. Ingredient quality and proportion are the two variables that separate a flat, forgettable dressing from the best Italian vinaigrette you have ever made at home. Rushing past this step is the most common reason home cooks end up with a dressing that tastes thin or one-dimensional.
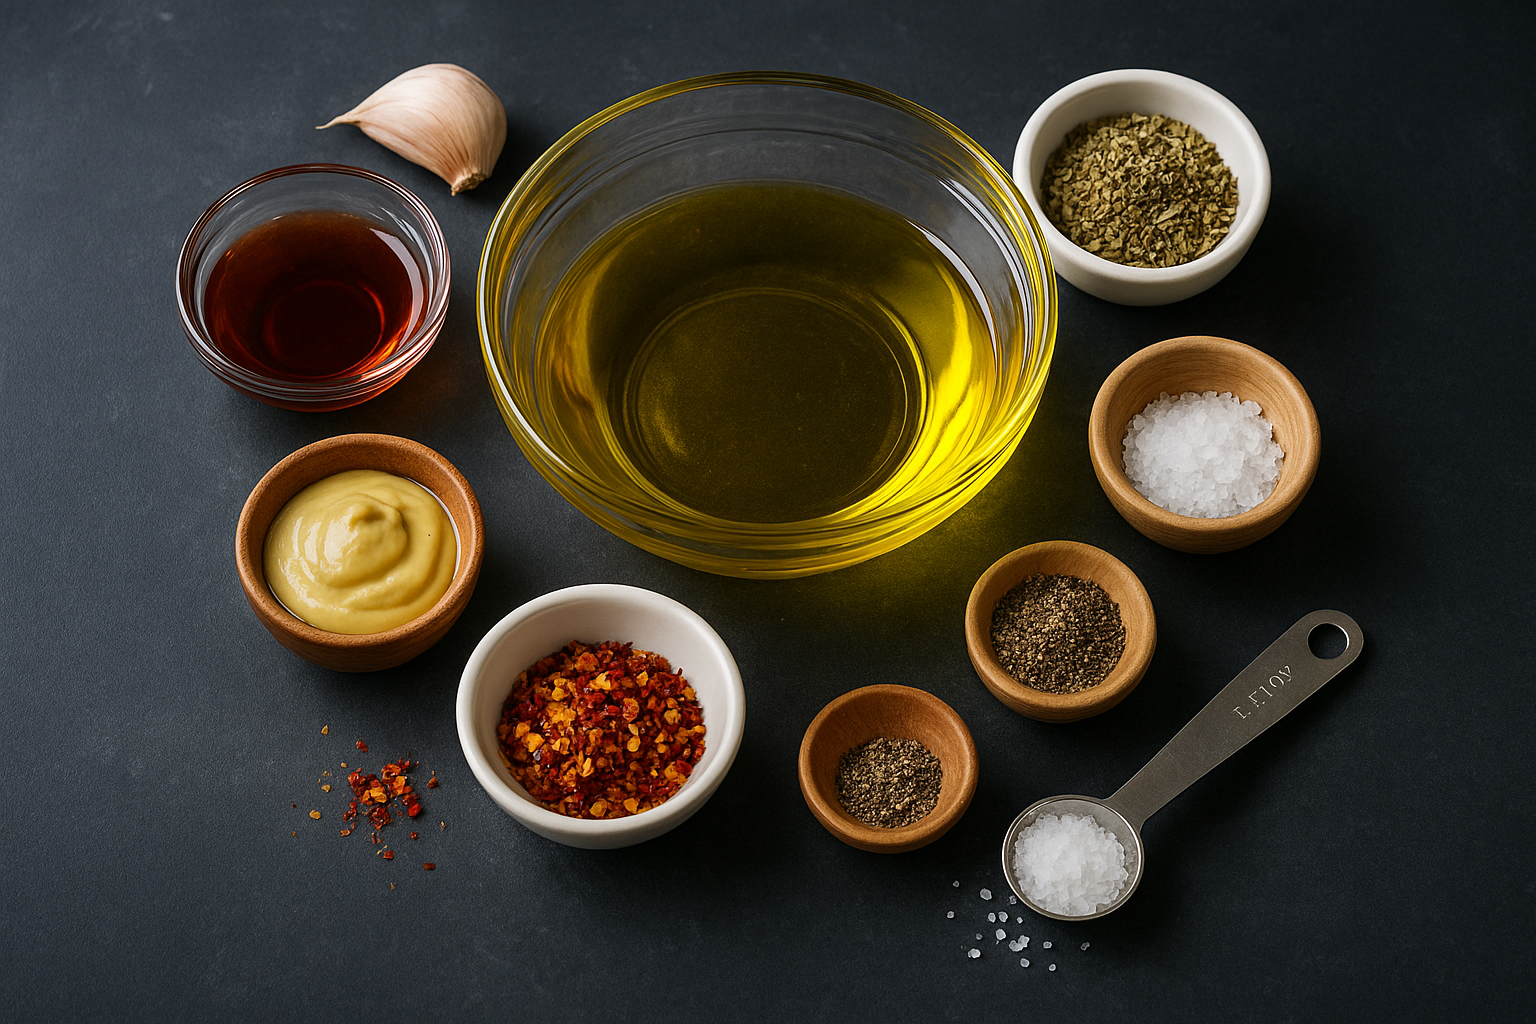
The core ingredient list
Every authentic Italian vinaigrette builds from the same short list of components. Red wine vinegar provides the acidic backbone. Extra virgin olive oil delivers body and flavor. Garlic, dried oregano, and a pinch of red pepper flakes supply the aromatic depth that makes the dressing taste distinctly Italian. A small amount of Dijon mustard helps with emulsification and adds a subtle savory note without announcing itself on the palate.
Here is a base recipe that serves four as a salad dressing:
| Ingredient | Amount |
|---|---|
| Extra virgin olive oil | 6 tablespoons |
| Red wine vinegar | 3 tablespoons |
| Dijon mustard | 1 teaspoon |
| Garlic (minced or grated) | 1 small clove |
| Dried oregano | 1/2 teaspoon |
| Red pepper flakes | Pinch |
| Kosher salt | 1/2 teaspoon |
| Black pepper | To taste |
Get the ratio right before you mix anything
The ratio of acid to oil is not a suggestion you can ignore. A 1:2 ratio (one part vinegar to two parts oil) produces a bright, punchy dressing suited for assertive greens like arugula or radicchio. A 1:3 ratio gives you something gentler that works better on delicate greens like romaine or butter lettuce. Start at 1:2 if you are new to making this from scratch, then adjust toward 1:2.5 once you understand how the balance affects the final taste on different ingredients.
Always taste your vinegar and oil separately before you combine them. Knowing what each one brings helps you decide exactly how far to push the ratio for the dish you are making.
Staying consistent is easier when you measure by tablespoon rather than by eye. Pour your vinegar into the bowl first, then add the mustard, garlic, and seasonings. Adding the oil last gives you full control over the emulsification process, which the next step covers in detail.
Step 2. Build the flavor base
With your ingredients measured and your ratio set, the next job is layering the flavor components in the right order. This sequence matters more than most people realize. Acid dissolves salt and activates aromatic compounds in a way that oil simply cannot, so you always build the flavor base in the vinegar before the oil enters the mix. Skipping this sequence flattens the dressing before it even comes together.
Start with the acid and your aromatics
Add your red wine vinegar to the bowl first, then drop in the minced or grated garlic. Let the garlic sit in the vinegar for two to three minutes before you add anything else. This short rest mellows the raw, sharp edge of fresh garlic without stripping its flavor entirely. The acid begins a light pickling process that makes the garlic taste rounder and more integrated in the finished dressing.
Next, add your Dijon mustard, dried oregano, and red pepper flakes directly to the acid. Stir everything together so the mustard begins to dissolve into the vinegar. Dried oregano releases more of its essential oils when it has contact with liquid first, so giving it time in the vinegar before the oil arrives means you extract more flavor from the same amount of herb. This small detail is what separates a flat dressing from the best Italian vinaigrette you have ever made at home.
Let the garlic and herbs sit in the acid for at least two minutes before adding oil. That short window changes the final flavor noticeably.
Season the base before the oil goes in
Salt dissolves far more efficiently in acid than in oil, which is why you add it at this stage rather than at the end. Measure your kosher salt directly into the vinegar mixture and stir until it fully disappears. You should see no visible grains left in the bowl. Adding salt after the oil is already incorporated means it sits on top rather than becoming part of the dressing’s underlying structure.
Black pepper goes in here as well. Crack it fresh if you can, because pre-ground pepper loses its top notes quickly and produces a flat, slightly dusty flavor rather than the bright, spicy bite that freshly cracked pepper delivers. Taste the acid mixture on its own before you move forward. It should taste sharp, herby, and well-seasoned throughout. If it reads flat, add a small pinch more salt before moving to emulsification.
Step 3. Emulsify, taste, and adjust
With the flavor base fully built, you are now ready to bring the dressing together into a cohesive, stable mixture. Emulsification sounds technical, but it simply means getting the oil and vinegar to combine into a smooth, unified texture rather than sitting in separate layers. This step determines whether your dressing coats greens evenly or slides right off the plate.
Emulsify the dressing properly
Slow, steady oil addition is the key to a properly emulsified vinaigrette. Drizzle the olive oil in a thin, steady stream while whisking the vinegar mixture constantly. Do not pour everything in at once. Adding the oil gradually gives the mustard time to act as an emulsifier, binding the water-based vinegar and the fat-based oil into a temporarily stable suspension. If you rush this step, the dressing breaks almost immediately and you end up with a thin, separated liquid that looks nothing like what you would find at a restaurant.

Here are the two most reliable methods for emulsifying at home:
- Whisk method: Pour the oil slowly while whisking vigorously in a circular motion. This works well for small batches and gives you direct control over texture.
- Jar method: Combine everything in a small jar with a tight lid and shake for 20 to 30 seconds. This method works quickly and doubles as storage, though the emulsion is typically less stable than the whisk method.
The jar method is convenient, but the whisk method gives you a better-integrated dressing that clings more evenly to greens and vegetables.
Taste, then adjust with intention
Once you have whisked the dressing together, taste it before you serve anything. Dip a piece of lettuce or a clean spoon into the bowl and evaluate what you experience. You are looking for balance between the acid, the oil, and the seasoning. If it tastes flat, add a small pinch more salt. If it tastes harsh, pour in a touch more oil and whisk again. If the herbal notes feel buried, rub a small pinch of dried oregano between your fingers and fold it in.
Knowing what to listen for on the palate is what makes the best Italian vinaigrette something you can dial in repeatedly, not just stumble onto once. A dressing that bites too sharply on the back of your throat needs more oil. One that tastes heavy or greasy needs a few extra drops of vinegar to cut through. Small adjustments make the difference between a dressing that works and one you will want to make every week.
Step 4. Store it right and use it well
Making the best Italian vinaigrette from scratch gives you a perishable product, not a shelf-stable bottle. How you handle the dressing after mixing determines whether it tastes as good on day three as it did when you first whisked it together. Two minutes of proper storage now means you are not starting from scratch every time you want to dress a salad.
Keep it cold and shake it before every use
Transfer your finished vinaigrette into a clean glass jar with a tight-fitting lid and refrigerate it immediately. Glass keeps flavors cleaner than plastic, which can absorb odors from the fridge and transfer them into the dressing over time. A jar with a lid also makes it easy to re-emulsify the dressing with a quick shake before each use, since even a well-made vinaigrette will separate in the refrigerator as the oil solidifies slightly around the cold acid.
Homemade vinaigrette keeps well for up to one week when stored cold. Beyond that, the fresh garlic begins to degrade and the bright top notes from the red wine vinegar dull noticeably. Write the date on the jar with a piece of tape so you know exactly when to make a fresh batch. If the oil has turned completely solid in the refrigerator, let the jar sit at room temperature for five minutes before shaking and serving.
Always let refrigerated vinaigrette come slightly closer to room temperature before dressing greens, because cold oil coats unevenly and mutes the flavors you worked to build.
Use it beyond the salad bowl
Your vinaigrette does more than dress greens. Here are specific ways to put it to work in the kitchen throughout the week:
- Marinade for chicken or fish: Coat protein in vinaigrette for 30 to 60 minutes before grilling or roasting. The acid tenderizes lightly while the oil and aromatics add flavor.
- Drizzle over roasted vegetables: Spoon it over warm broccoli, zucchini, or bell peppers right out of the oven so the heat opens up the olive oil’s flavor.
- Dress a cold pasta salad: Toss cooked and cooled pasta with vinaigrette while it is still slightly warm so the noodles absorb the dressing rather than wearing it on the surface.
- Finish a grain bowl: Pour a tablespoon over farro or white beans as a finishing layer that adds acid and brightness to an otherwise heavy base.
Each of these uses draws on the same batch, so making a double recipe at the start of the week gives you a versatile kitchen tool rather than a single-use condiment.
Bring it to the table
You now have everything you need to make the best Italian vinaigrette from scratch, including the right ratio, the proper sequence for building flavor, and the techniques that keep your dressing tasting fresh all week. None of this requires special equipment or hard-to-find ingredients. It requires attention to a short list of decisions that most home cooks rush past without knowing why they matter.
Make a batch this week and apply the adjustments as you go. Taste at every stage, write down what you changed, and repeat the version that worked. A recipe you understand is one you can improve. Once you have this dressing dialed in, you will find yourself reaching for it far beyond the salad bowl.
If you want to experience Italian flavors prepared with that same level of care, visit us at La Dolce Vita Cucina in Chicago’s Portage Park neighborhood and see what a commitment to quality ingredients looks like on the plate.